Kategori: Ukategorisert
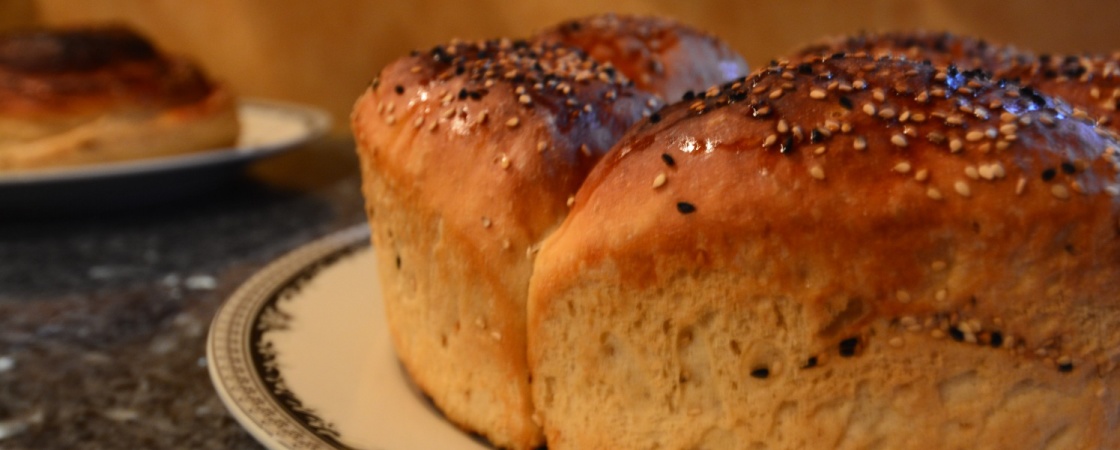
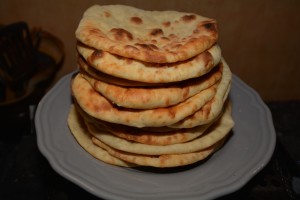
Persian bread Nan-e Barbari
This time I would like to share with you my experience of making Persian bread. As some of you may have understood, I have an infatution with bread and baking. It never stops to fascinate me, the types, techniques, the various ingredients and the nearly infinite amount of products.
My close Persian friends and sisters Sara and Nahid, helped me discover the many wonders of the rich Persian cuisine, offering endless amazing dinners. Colorful, varied and truly delicious.
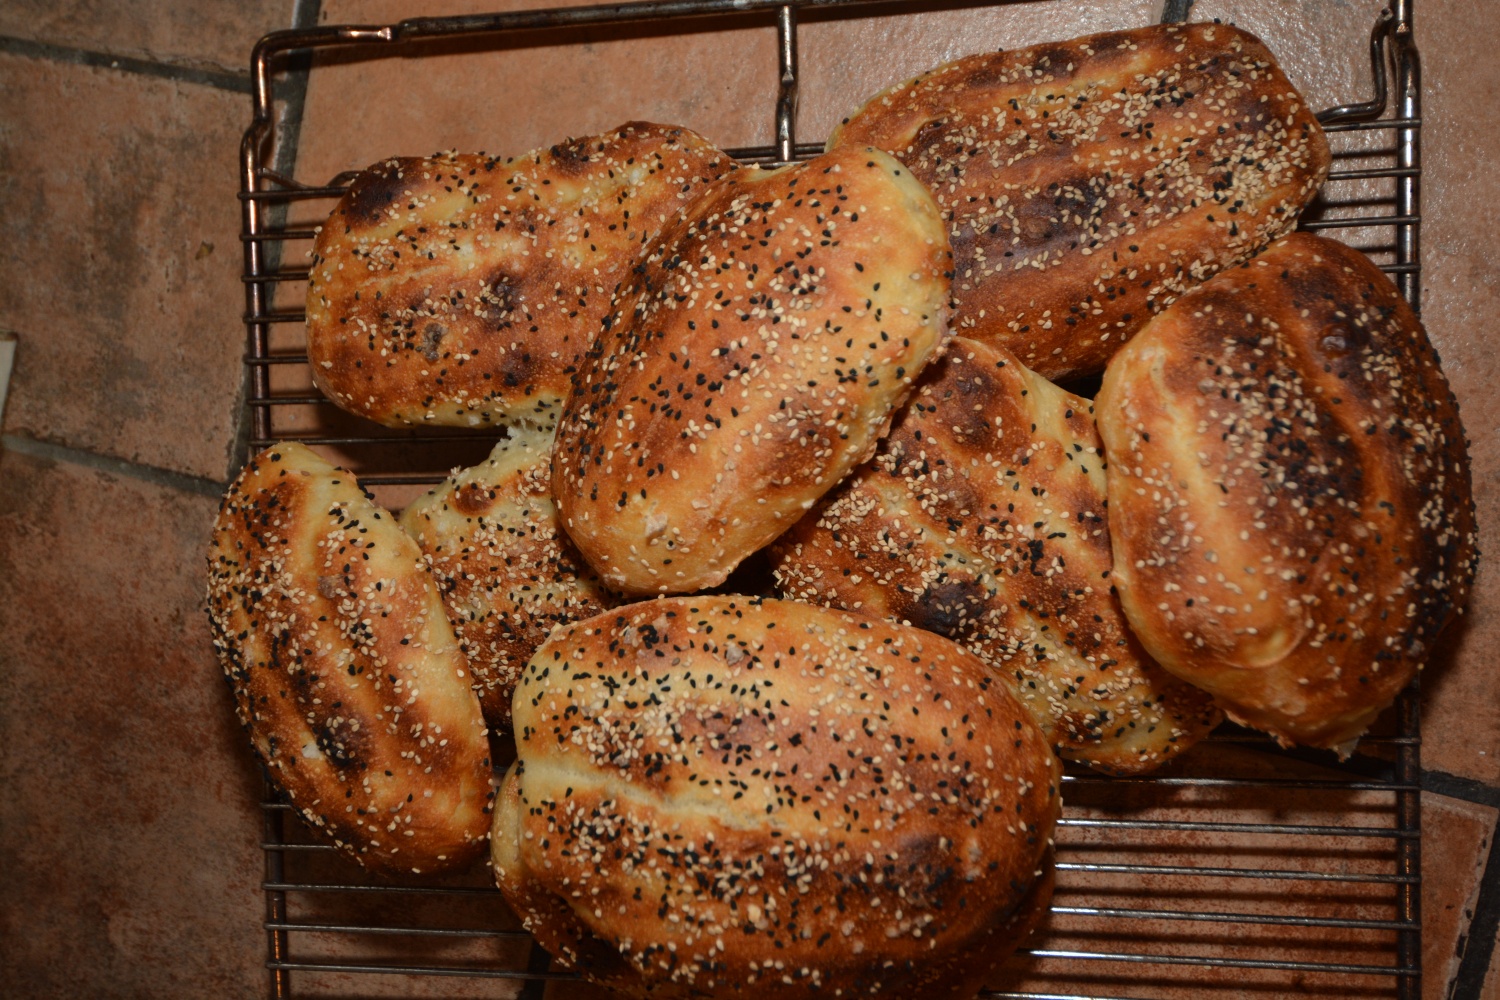

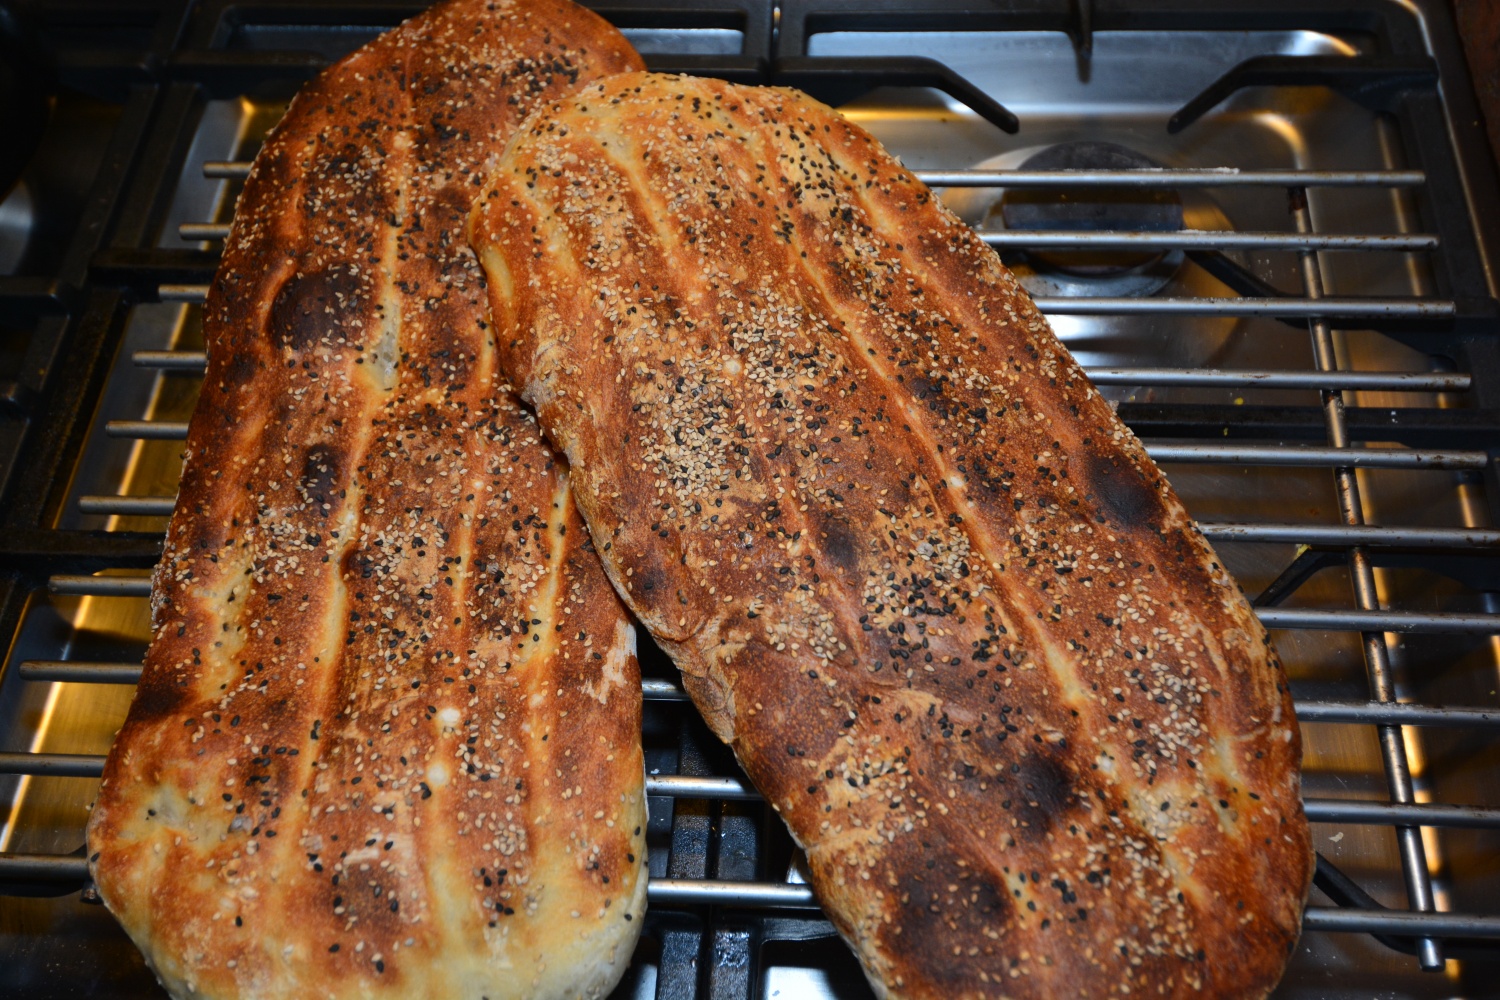
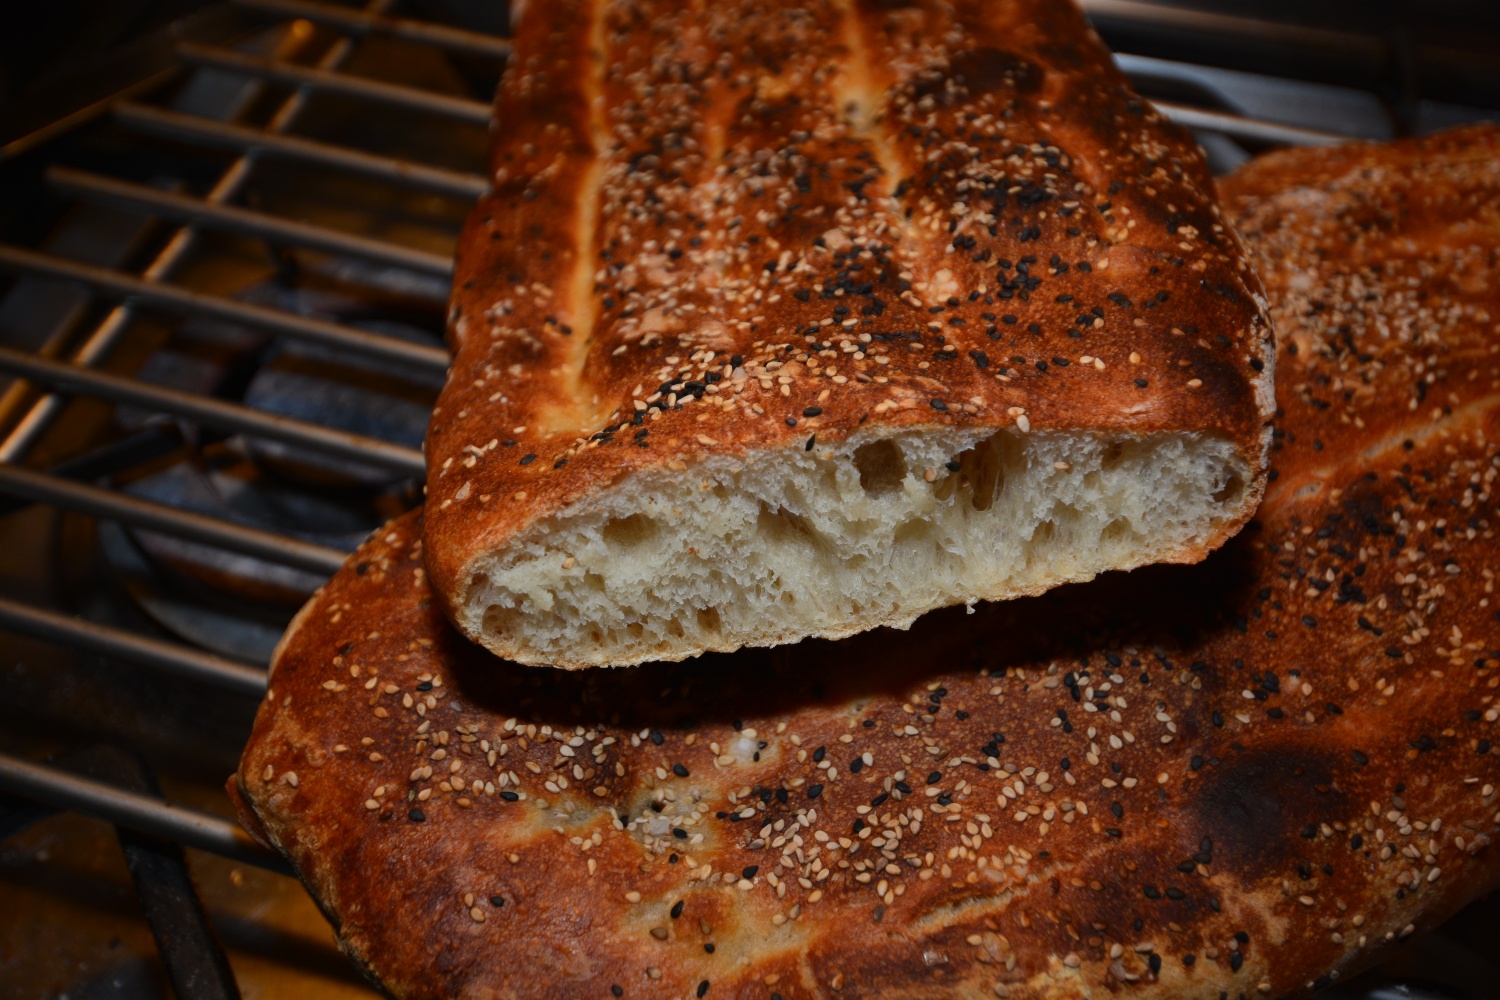
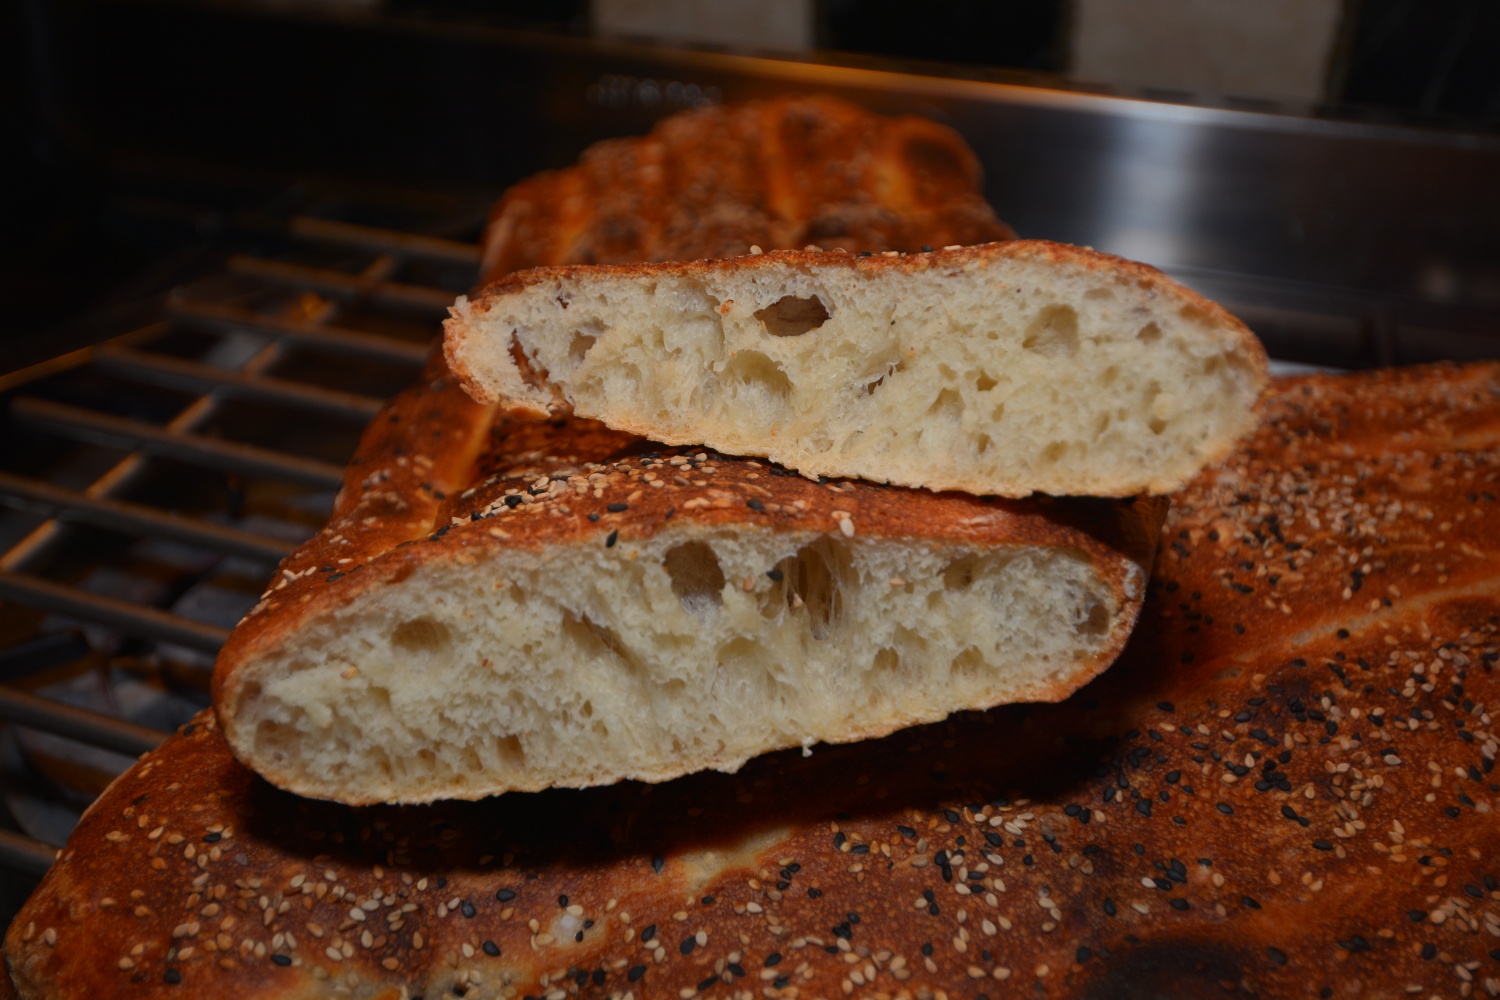
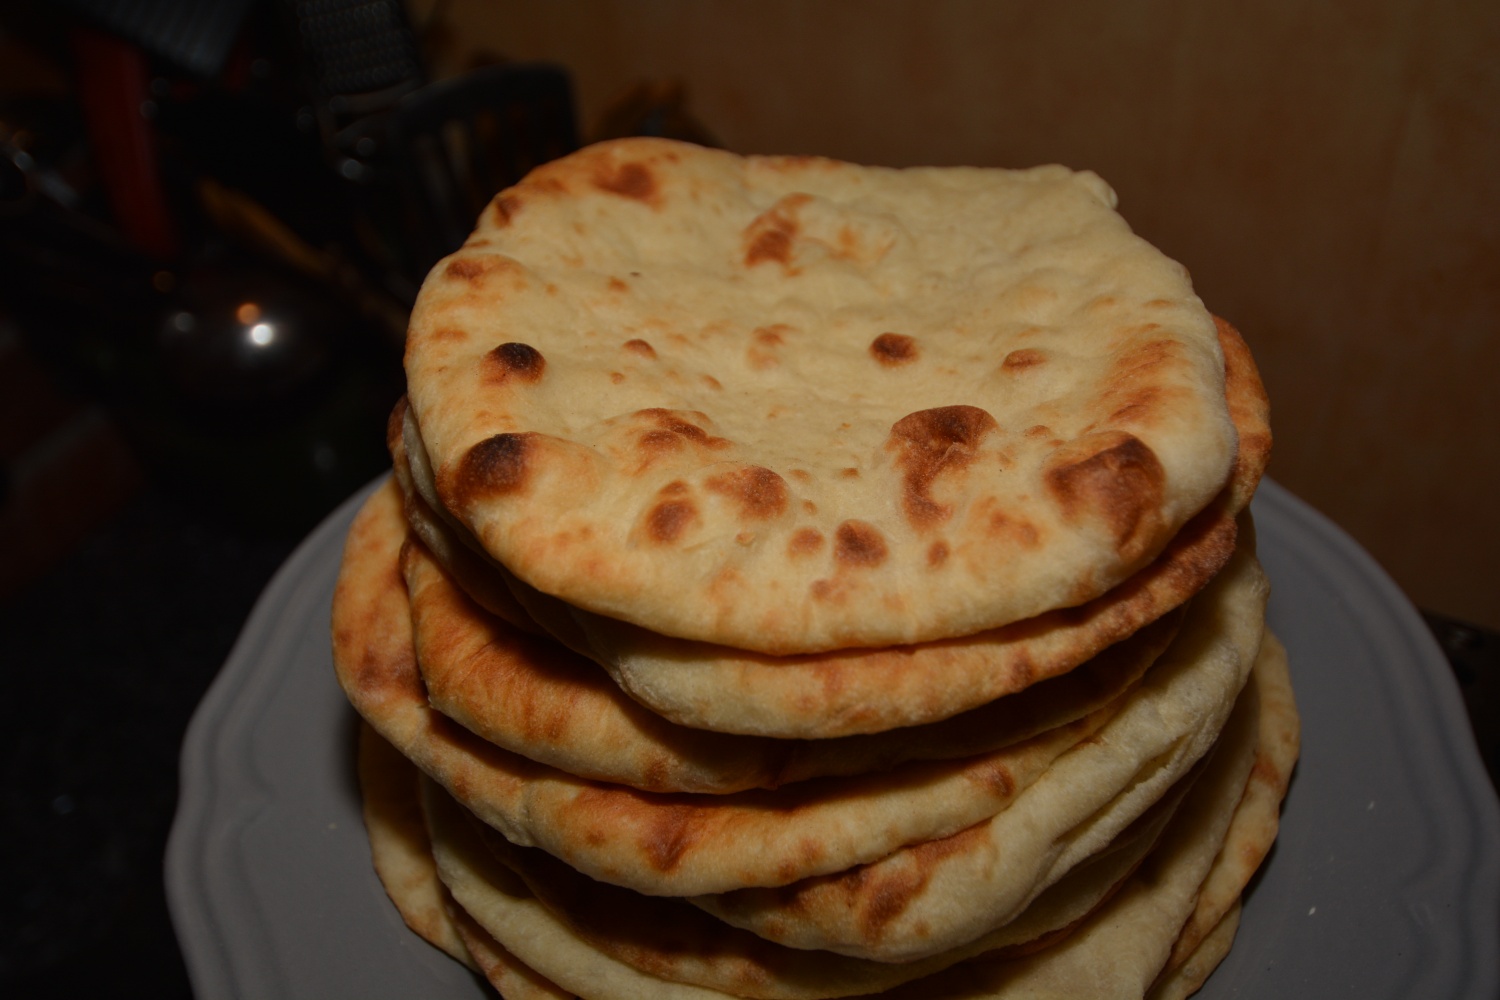
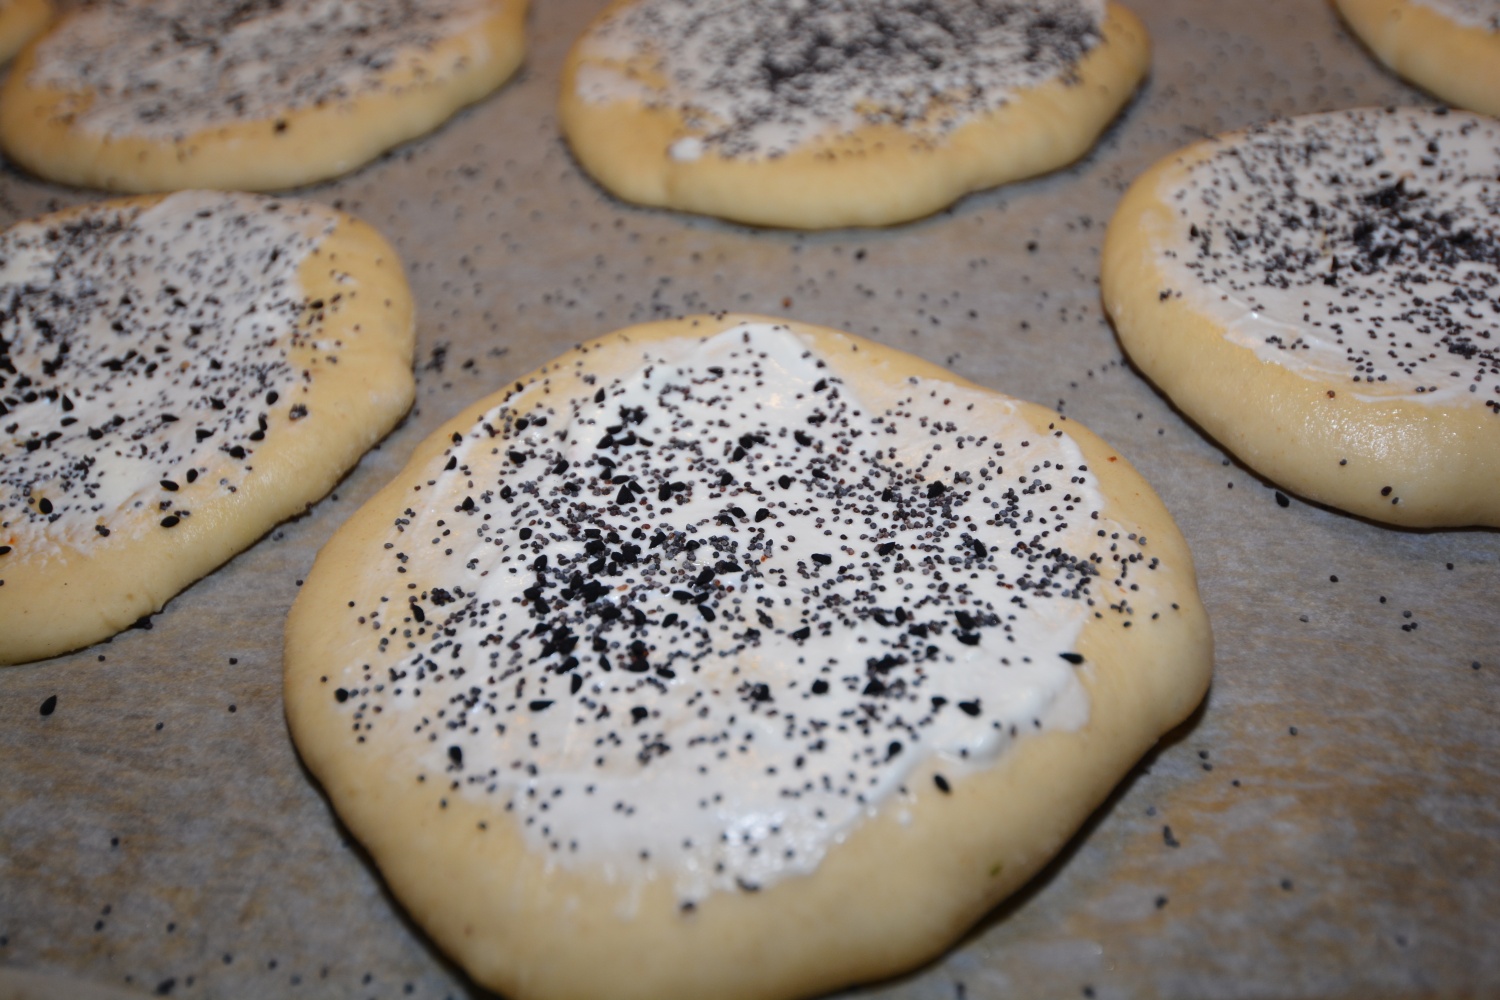
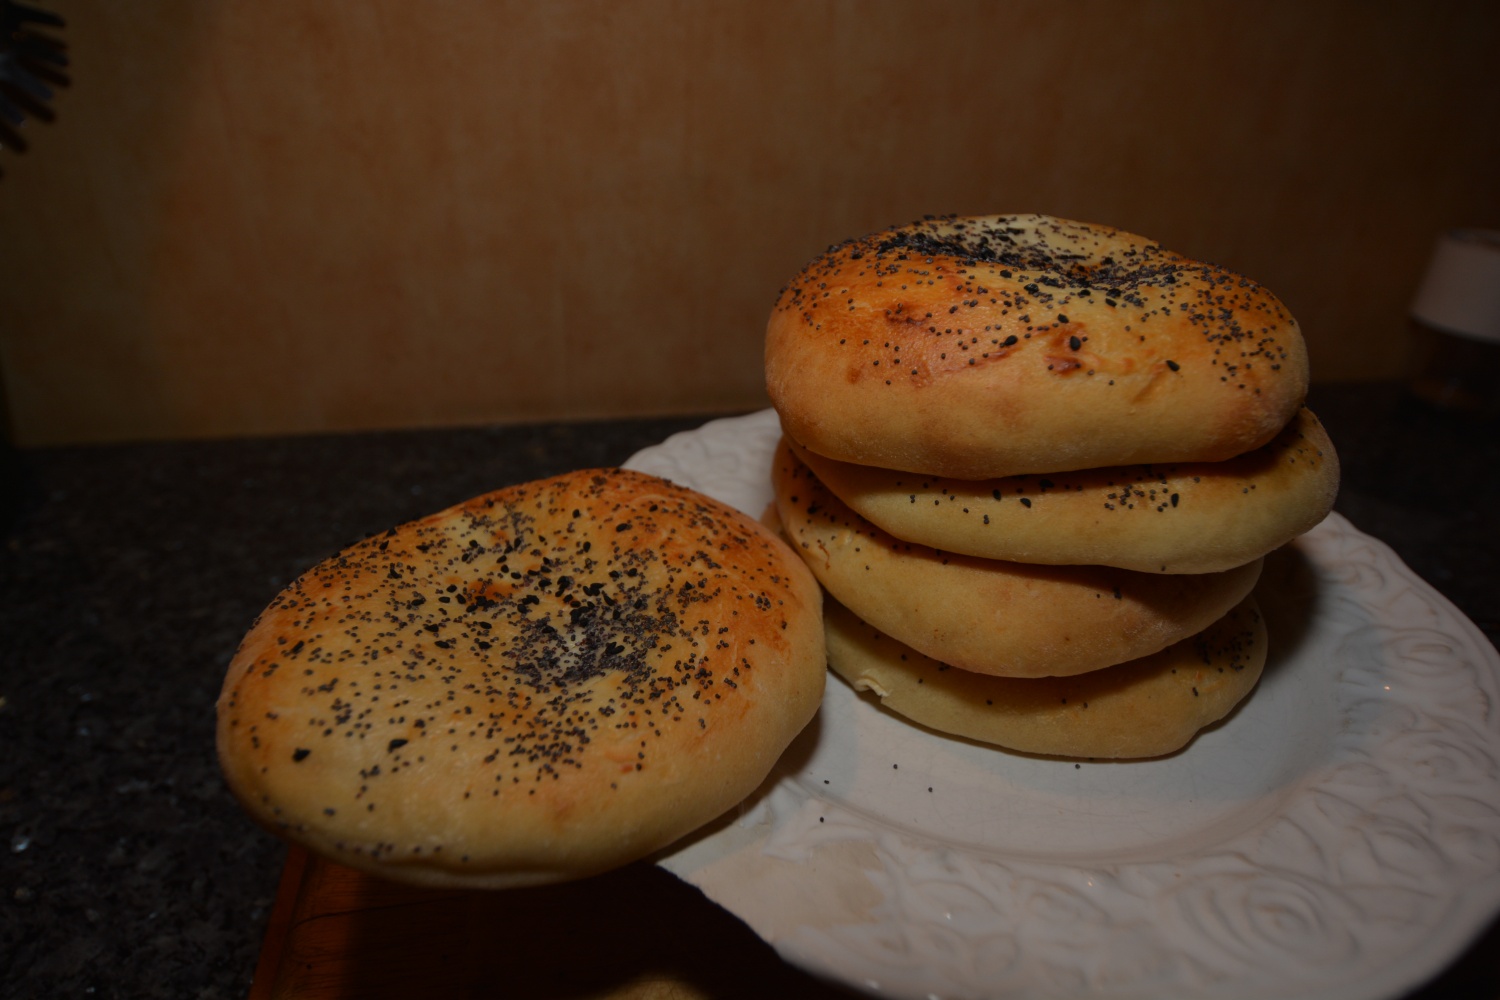
Nan-e Barbari is a type of flat bread, the name means «related to the Barbars». These are a people living near the eastern borders of Iran. After it was brought to Teheran, it became popular. It is the most common bread in Iran and often served with Lighvan cheese, similar to Feta cheese. It’s outside crispiness and inner softness, makes it ideal for scooping up sauces from the plate. It is also called Tabrizi bread, because of it’s connections with the city of Tabriz.
Before baking, the dough is covered with roomal, a flour paste consisting of flour, water, oil and sometimes sugar. This gives it a crispy texture and golden appearance. In my recipe the roomal is just flour and water, giving me equally satisfying results.
You need the following;
- 600 gr flour
- 300 gr pizza or «00» flour
- 2 tsp salt
- 1 tsp dry yeast
- 650 ml tepid water
- sesam or black nigella seeds
For the roomal;
- 2 tbs flour
- 6-7 tbs water
This recipe is enough for two oval flat bread or six smaller.
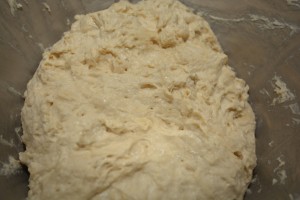
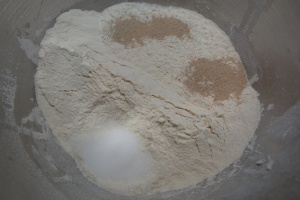
Mix the yeast and water in a bowl. In a second bowl mix the two flours and salt. Let the mixture pass a sieve into the first bowl. The consistency of the dough will be quite sticky. Let it stay covered for 10 minutes. Take the edges and fold into the center 10 times, taking care to change sides. Cover and let stay for 15 minutes. Repeat the folding process again. Cover again and let stay for 1 hour. Meanwhile warm oven til 250 C, preferably with a baking stone for best results.
Mix 2 tbs flour and 6-7- tbs water in a casserole. Cook on low heat, mixing until you get a liquidy roux, taking care not to cook to long. According to my experience, the roux needs to be smooth to brush the dough. After the 1 hour rising of the dough, it will be full of air bubbles. Put the dough on a floured surface, dividing the amount of dough needed with a dough knife.
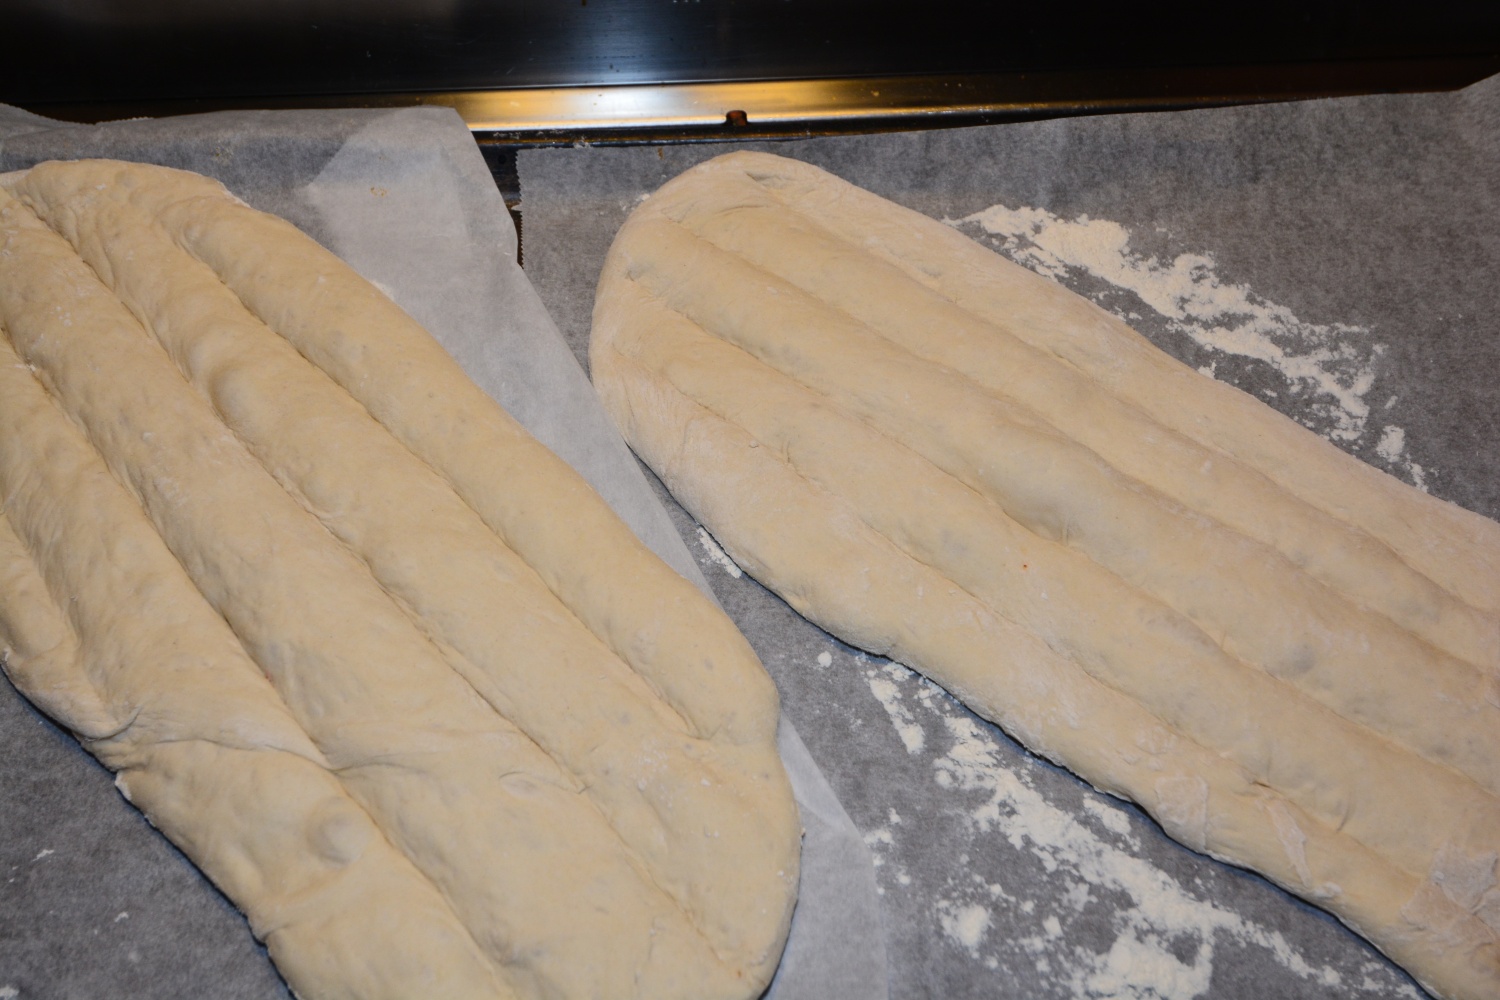
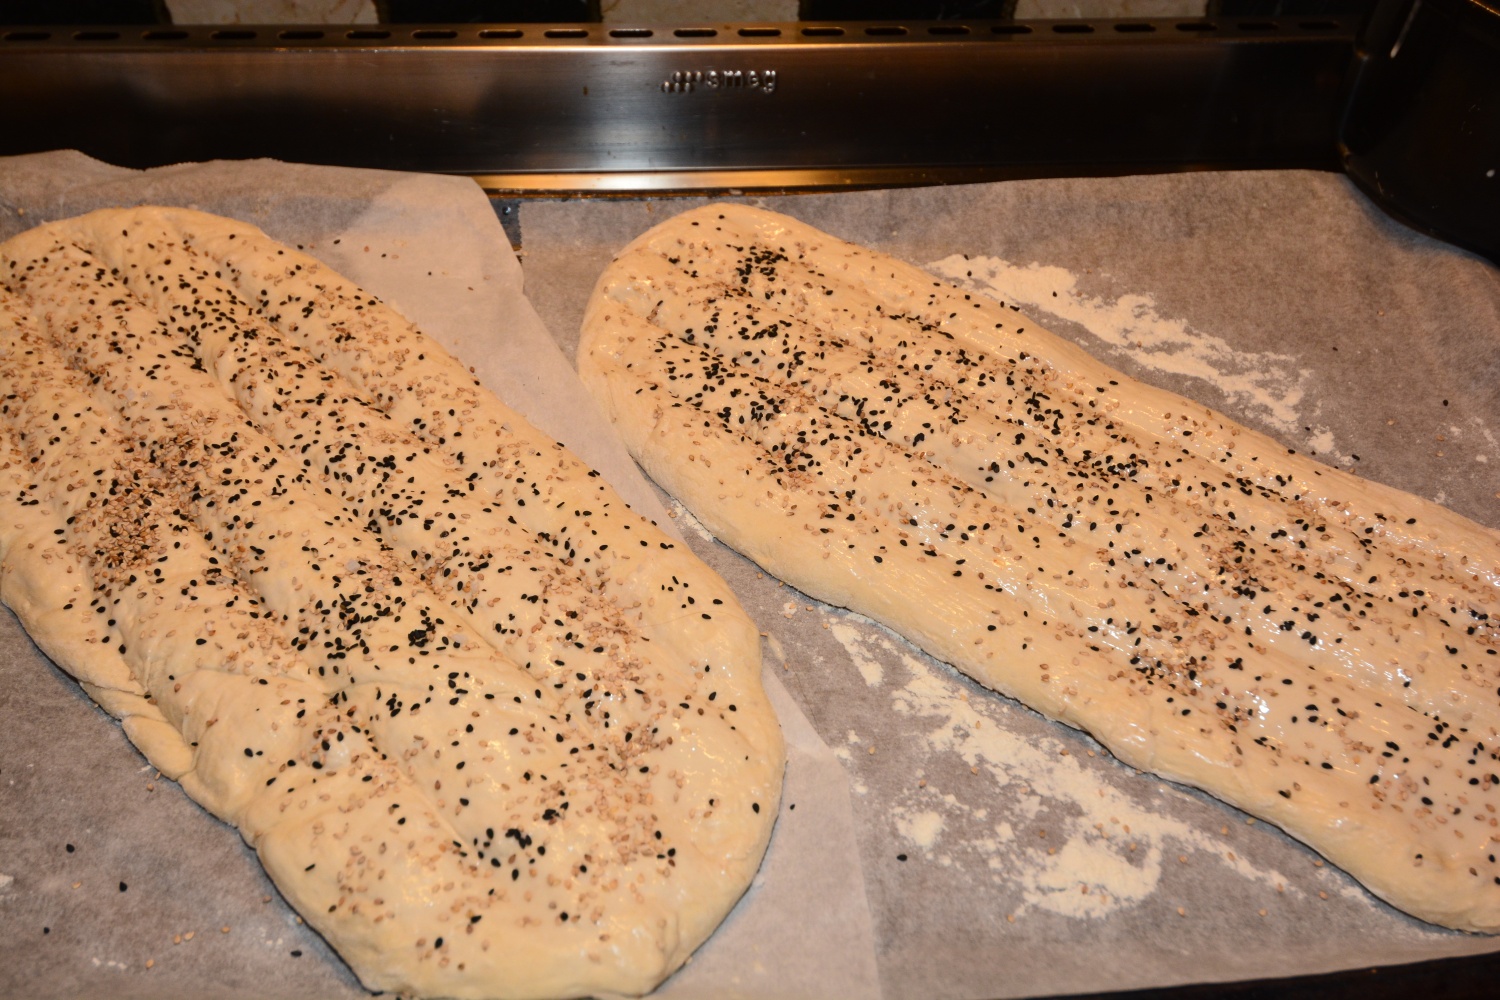
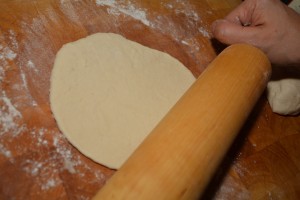
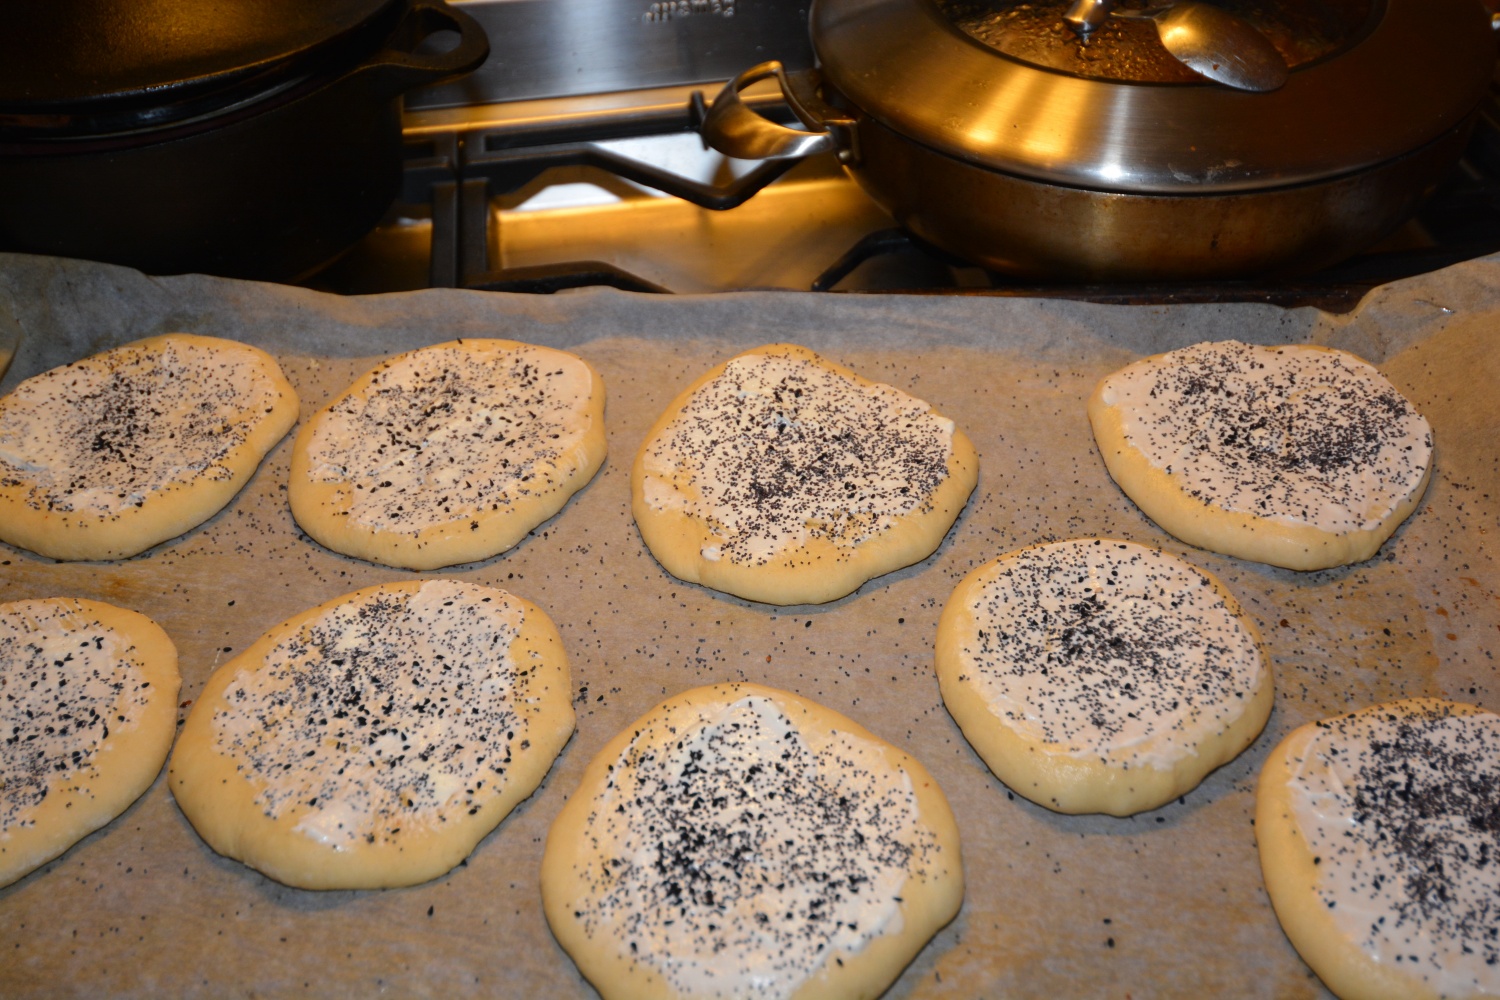
Fold the first piece into a round shape and stretch it to oval shape. Put in a form on baking paper. Stretch lines along the dough with your fingers or with a round shaped tool to create a deep line through the bread . Brush the roomal on the bread and spread the Nigella, sesame seeds and coarse salt on the surface.
After putting it in the oven lower to 220 c. Bake for 25 minutes or until tanned with brown color and the bread gives a hollow sound upon tapping from the bottom. Try baking all the bread at the same time, preventing it from rising too much. If not, put the rest into the fridge.
If you have any questions, I will be happy to try to answer them.
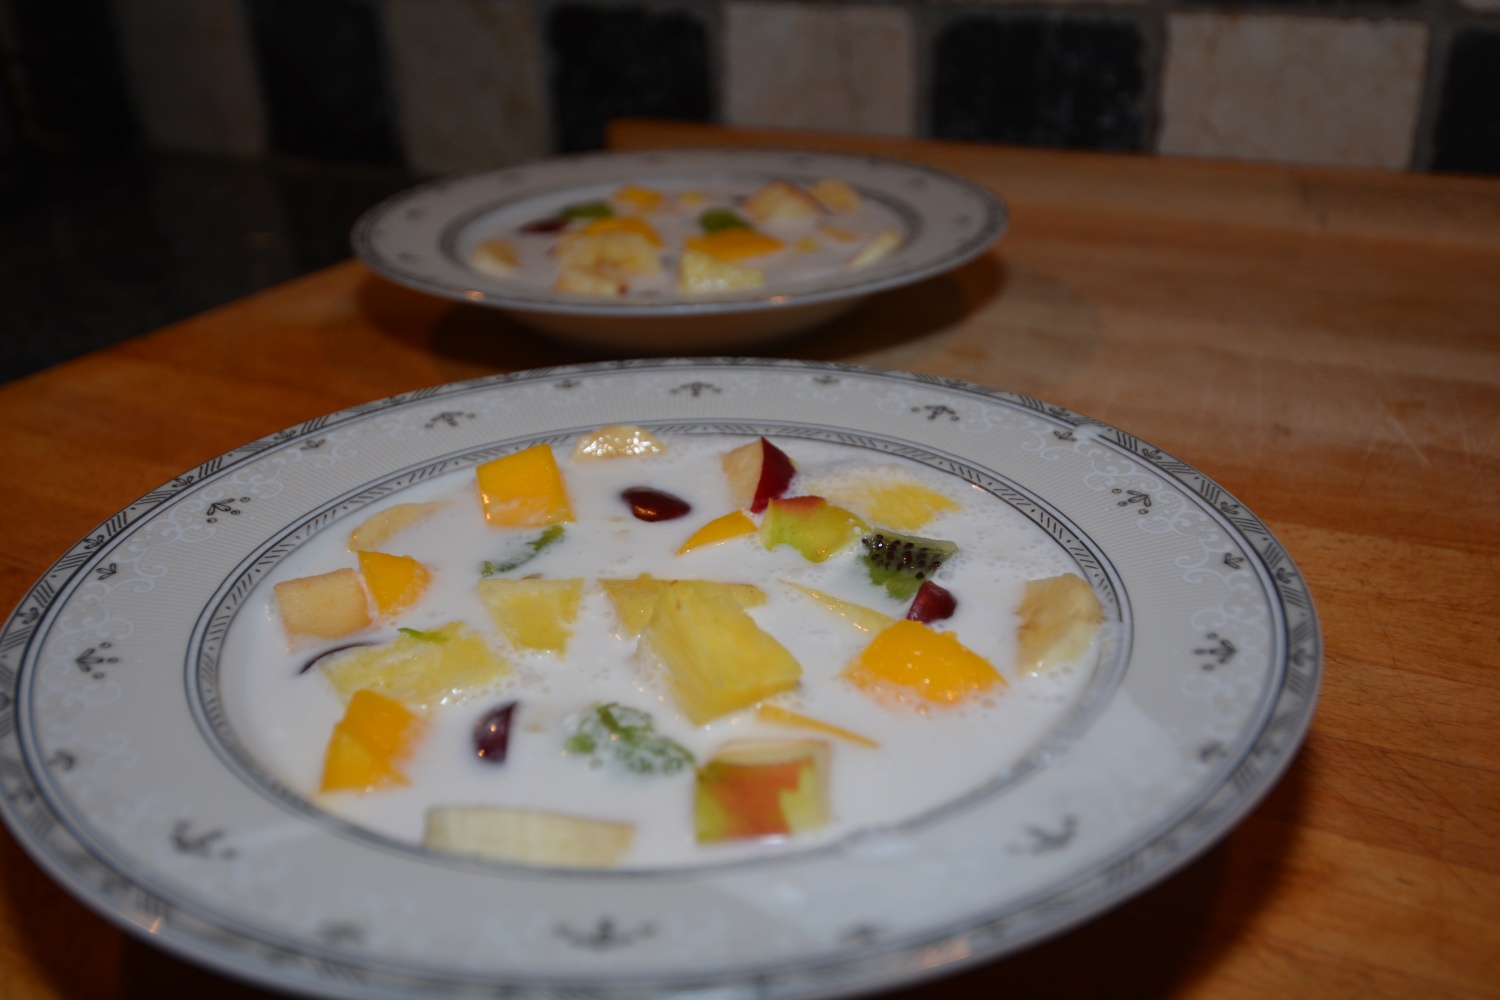
Cold coconut soup

This time a want to share with you a dessert. It’s oriental, colorful and slightly different. It is not heavy, not too sweet But most of all, it’s easy to prepare. We recently had it with some friends who came over. And they very much liked it!
This is a Thai dessert that is used with banana. It is usually served warm but my recipe is served cold. To make a new twist, I decided to add to banana different fruits, mostly tropical. I used mango, ananas, kiwi, grapes as well as some apple. I add crushed lemon grass in addition to the traditional recipe and chose not to use 1/2 tsp jasmine essence. The recipe is for four-five.
You need the following before adding the fruit;
- 500 ml coconut cream
- 1/2 cup coconut or brown sugar
- 1/2 cup of water
- 2-3 spoons of coconut powder
Do as follows;
Combine above ingredients in a casserole. Bring to boil, reduce heat and simmer for some minutes. After cooling it down and pouring it in the plates, added 1/2 a mango, a quarter of an ananas, 1 banana, 2 kiwi, 1/2 an apple and some halved grapes. All the fruits are roughly cut in cubes.
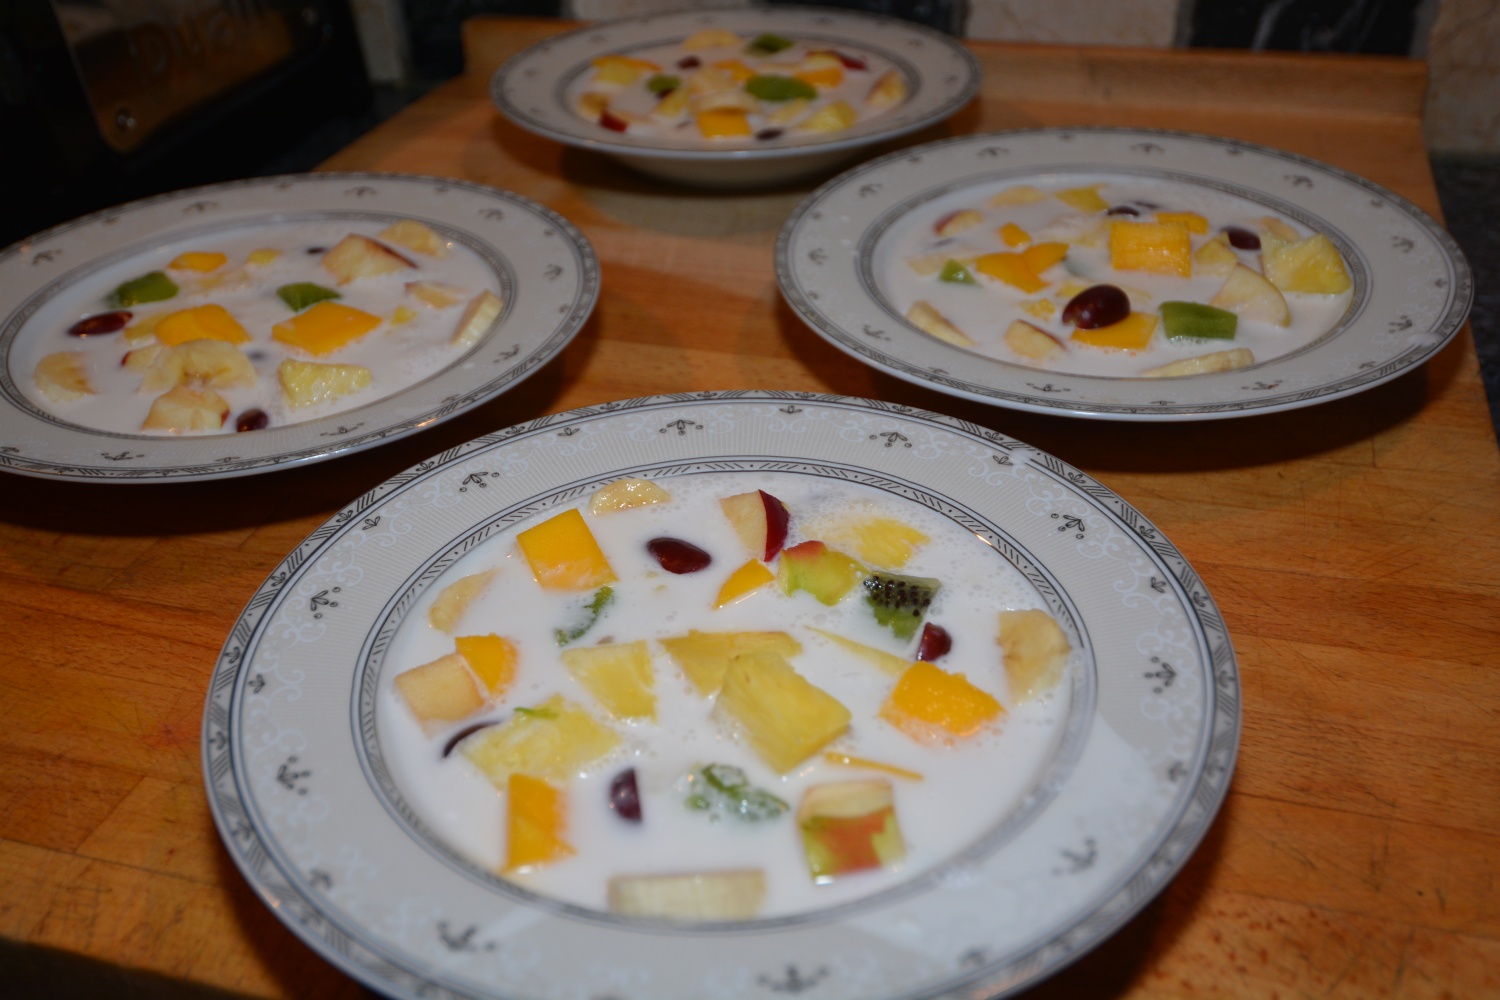
I did not thicken the soup, but due to the added coconut powder, it got the right consistency. You can add some lime to freshen the taste. Feel free to try and experiment for yourselves. The white background with the chopped tropical fruit, makes a nice contrast. As well as an interesting celebration of tastes in the mouth.
P.S. Sorry for the fact that the pictures are not as sharp as they should. They were taken during the time of preparation and it all went rather fast…
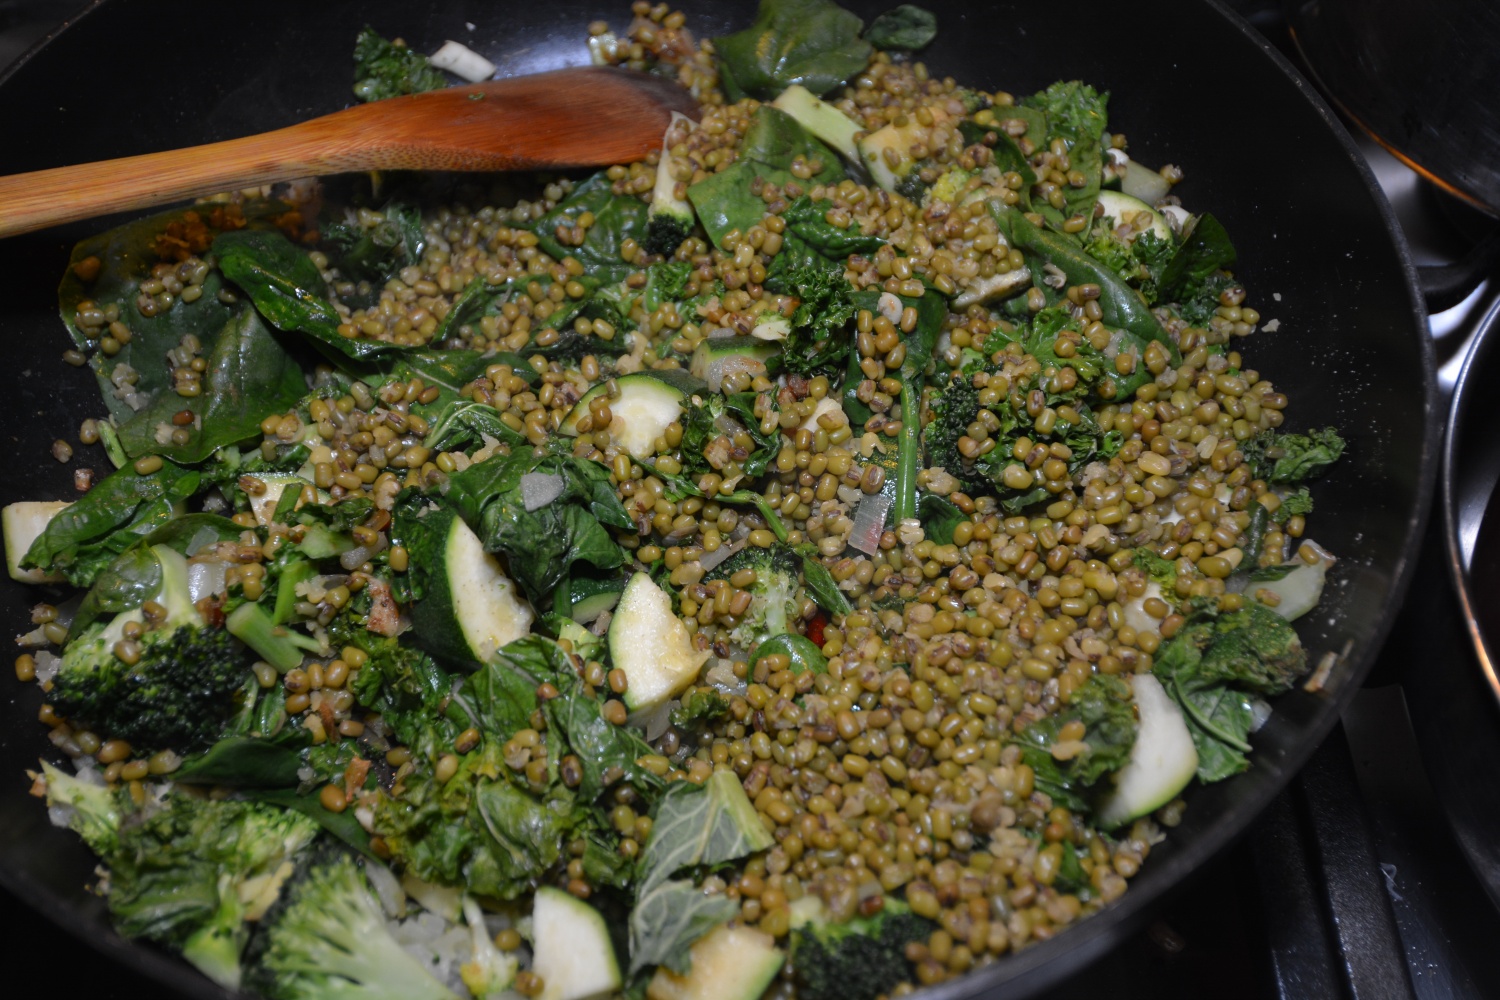
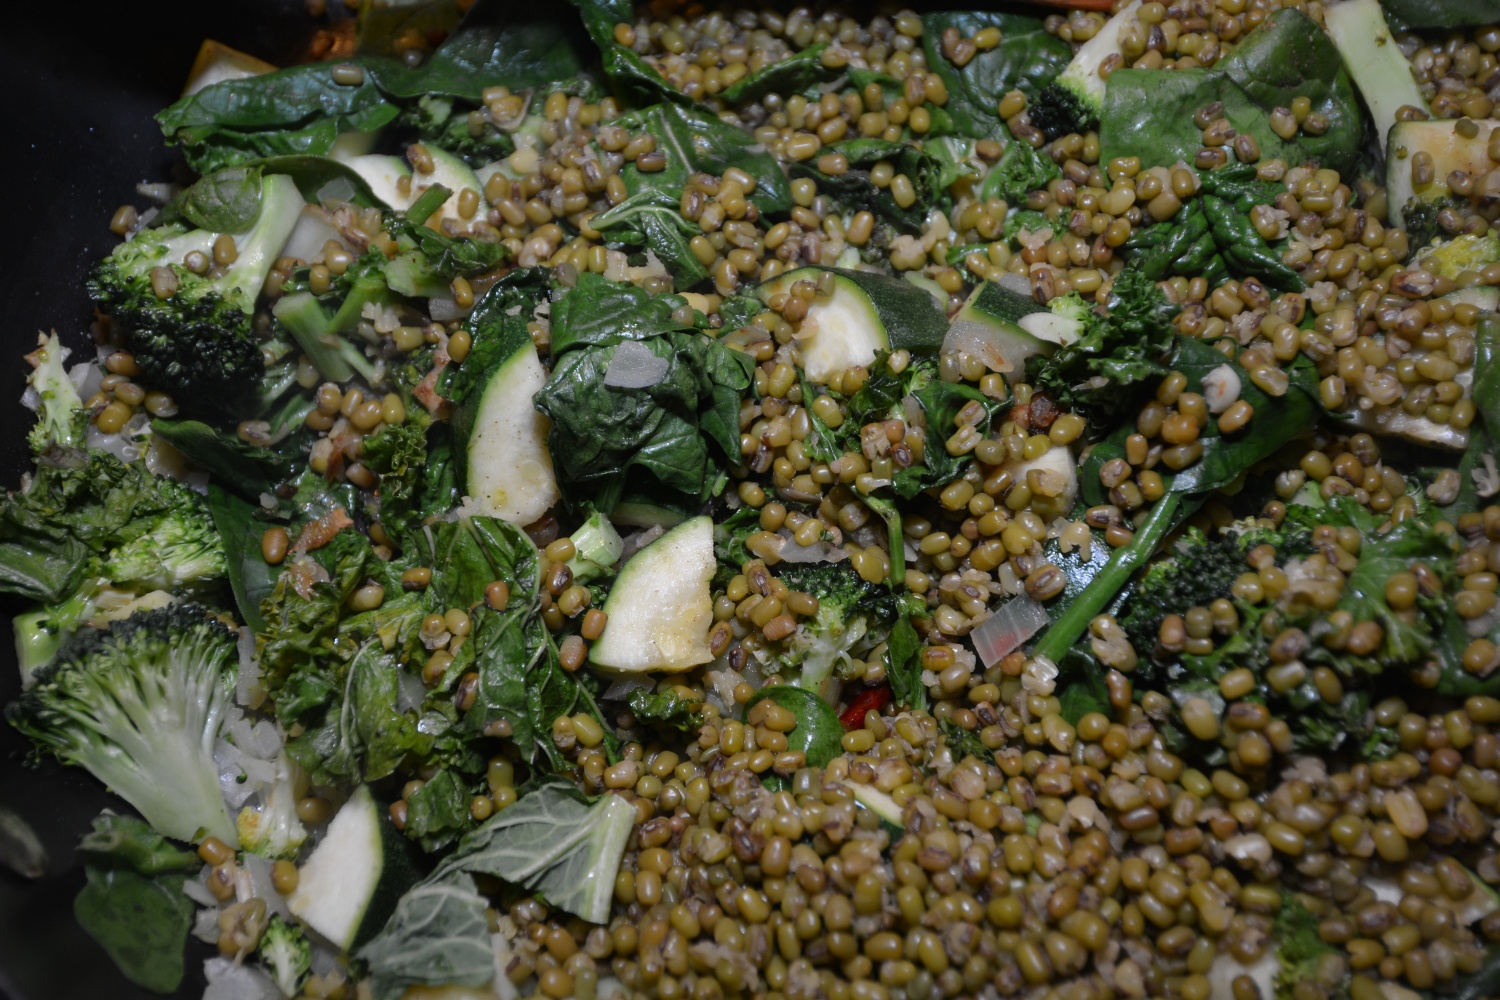
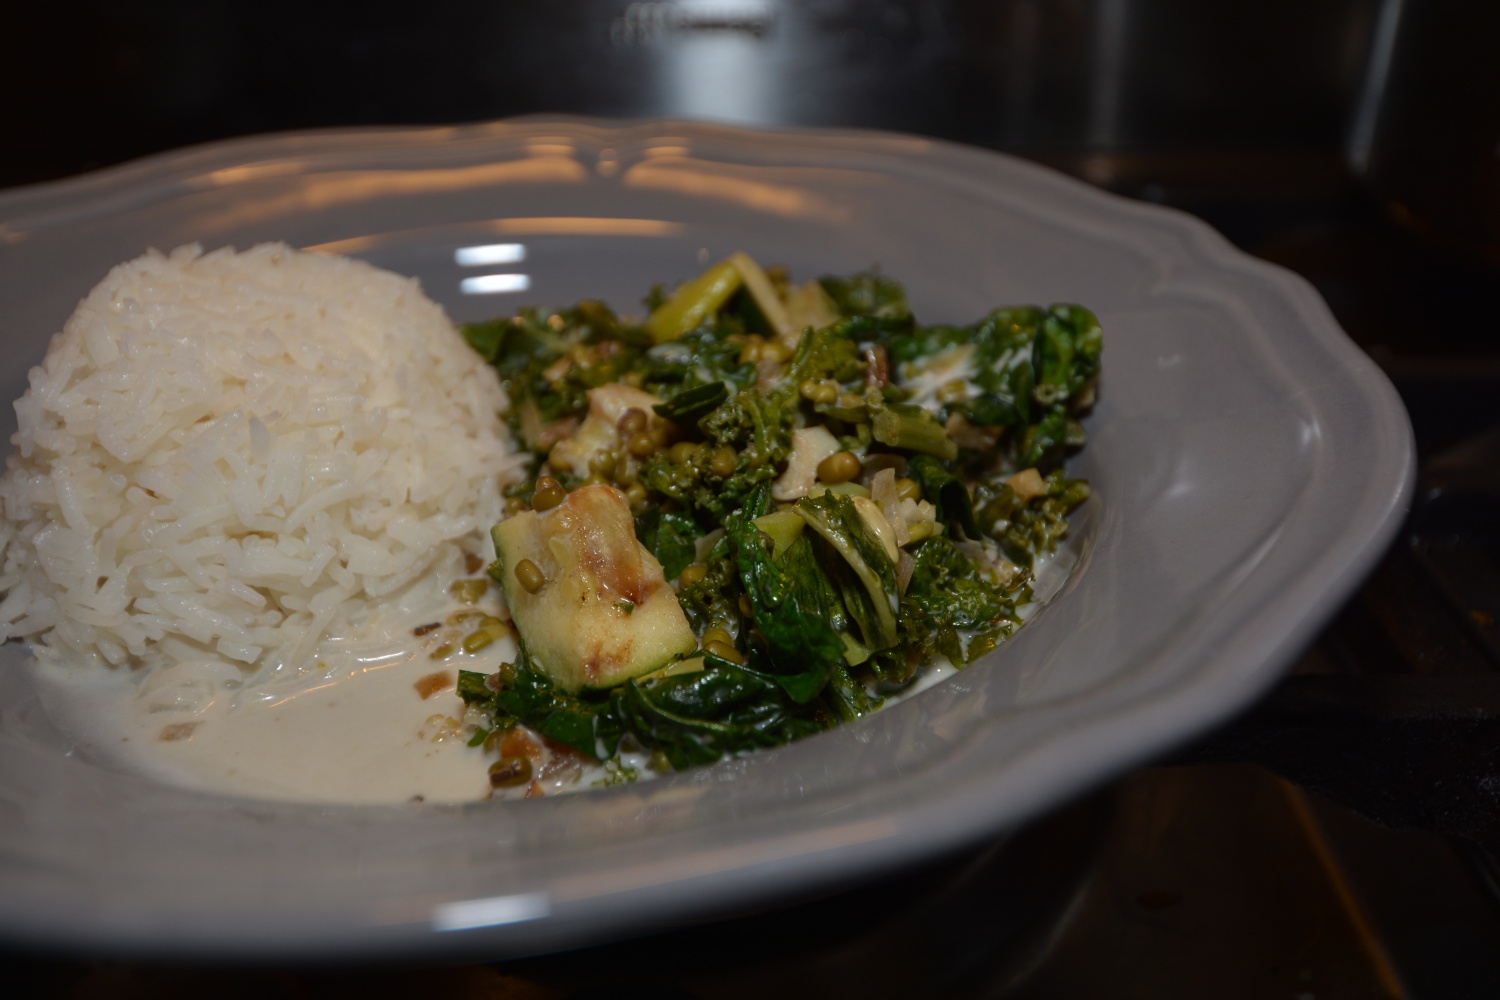
Mung bean greens casserole
As part of a healthy eating, l focus on preparing a variation of vegetables of different kind and color, including beans and healthy spices as well as green fresh herbs.
Part of the weekly dinners are vegan/vegetarian and today l made a mung beans green casserole. It is very nutritious and contains lots of proteins, fibers, iron and minerals, almost like meat. Research also have showed that they can prevent heart disease as well as different forms of cancer.
Mung beans are originally from India and have a place in the Asiatic kitchen. They are easy to prepare and don’t need to be pre-soaked, like other type of beans.
This dish is adapted from the blog «Greenkitchensories.com».
You need the following for 4-6 people:
- 2 cups dried mung beans, cooked
- 1 tbsp coconut or olive oil
- 1 onion finely chopped
- 1 cm ginger, finely chopped
- 2 cloves of garlic, finely chopped
- 1 celery stalk, chopped in cubes
- 100 gr kale leaves, chopped
- 200 gr spinach
- 200 gr broccoli
- 1/2 zucchini chopped
- 1 tsp ground cumin
- 2 tbsp lemon
- 1 small fresh or dry chili
- 1 can of 400 ml coconut milk or cream
- 1 tsp salt
- 1/2 tsp turmeric or grated fresh, optional
Heat oil in casserole and add onion, ginger, garlic and cumin. Stir and when it get’s color, add the greens. Add the cooked mung beans and the coconut. Add some water if too thick. Bring to boil and cook for approximately 5-10 minutes.
If you soak and prepare beans overnight, cook them, to later freeze them in portions, you will have them ready whenever you need them.
Naan Heaven part 2
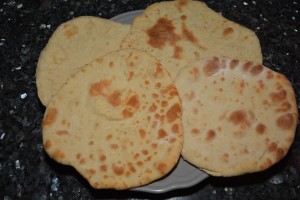
In my last Naan post, l was telling you about making Naan bread in a cast iron frying pan for lack of a Tandoori oven. Here I bring this concept a bit further. In this recipe, after frying one side of the dough in a cast iron frying pan, you transfer them to an oven and put them right under the grill. When the top starts to bubble and get color, they are ready. The point here is to make Naan bread that is as close as possible to the real thing, without having a clay Tandoori oven.
This recipe is giving good results, not too difficult and brings you half the way to India. After making them, you are probably not going to buy the ready made version again..
I doubled the quantity to be able to have them ready in the freezer for accompanying any Indian style dinner. It has a soft texture on the inside, because of the yogurt.
- 500 mg all purpose flour
- 200 ml lukewarm water
- plain yogurt
- 55 gr oil
- 7,5 gr sugar
- 5 gr dry yeast
- 5 gr salt
Put the yeast and sugar in lukewarm water. Let stand for 5-10 minutes until you see fine bubbles on the top.
Add the rest of the wet ingredients like yogurt and oil and when they are in, add the flour and lastly the salt. Start to work it by hand or in a kitchen machine until the ingredients are mixed together (by hand it will take you a minute,in a kitchen machine 15 seconds or so). Leave it for 20 min, (to allow the flour and liquid to mix better)
mix it again for 3 min just until it is get smooth, soft and come together (it is a wet dough but not mud sticky).

Take it out and divide it to 4 pieces after spreading a bit flour. (my frying pan is small so l divide to 8) Shape it to a ball and put on a tray. Let it rise about 30 minutes until doubling in size.

Flatten the balls gently on a floured surface and flatten further with a rolling pin.
Put it on a warm cast iron casserole on the heating source. When the dough rises and bubbles start to appear on the top, put them just under the grill in the oven on a tray. I found it more easy to remove the bread from the frying pan and transfer to the tray with out the pan.
As more bubbles will appear and as it get some color, remove from grill.
Naan is good as a base for various spreads,vegetables and sauces. Or you can put your meats, chicken or other ingredients on top – and enjoy yourselves.

Naan is good as a base for various spreads,vegetables and sauces. Or you can put your meats, chicken or other ingredients on top – and enjoy yourselves.
Baguette Mania
 In my passion for baking, I want to get the product as close as I can to the real thing. Since my childhood, l had this attraction and wish to learn the magic of baking. Baguette was one of those things that l had on my list to do. After years of baking bread l went on trying different recipes of baguettes. And believe me l tried.
I experimented with sour dough, with biga (a dough that you raised in advanced) and other that l raised for many hours. It was so important for me to arrive as close as possible to the real thing, the crunchy crust and soft inside with holes, that makes you to want more with every bite. But then l came across a simple way to do it with no fuss and great taste. I thought l would give it a try. l am very pleased with the result but l doubled and changed the quantities. From the original recipe you will get 3 baguette but with mine 6.
One more thing; with a normal all purpose flour or bread flour, you will be able to get a fine result but if you will use 00 Italian flour, the final result will be the real thing.

prep time; 10 min baking time: 30 min
- 1 kg of 00 flour /all purpose flour
- 3 cup of warm water
- 3 tsp of yeast
- 2 tsp of sugar
- 4 tsp of salt
Put the sugar and yeast in a small bowl, cover and let it rise for 5 min.
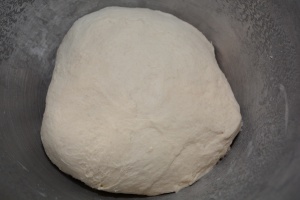
In a bowl add the flour, salt and the yeast mixture, mix on a medium low speed for about 8-10 min until it’s a smooth and creamy looking dough.(at this point the dough is very very sticky but that is the thing that will bring the final result). Oil a large bowl with olive oil and place dough inside, brush the dough and cover. Place warm and let rise until doubling in size.
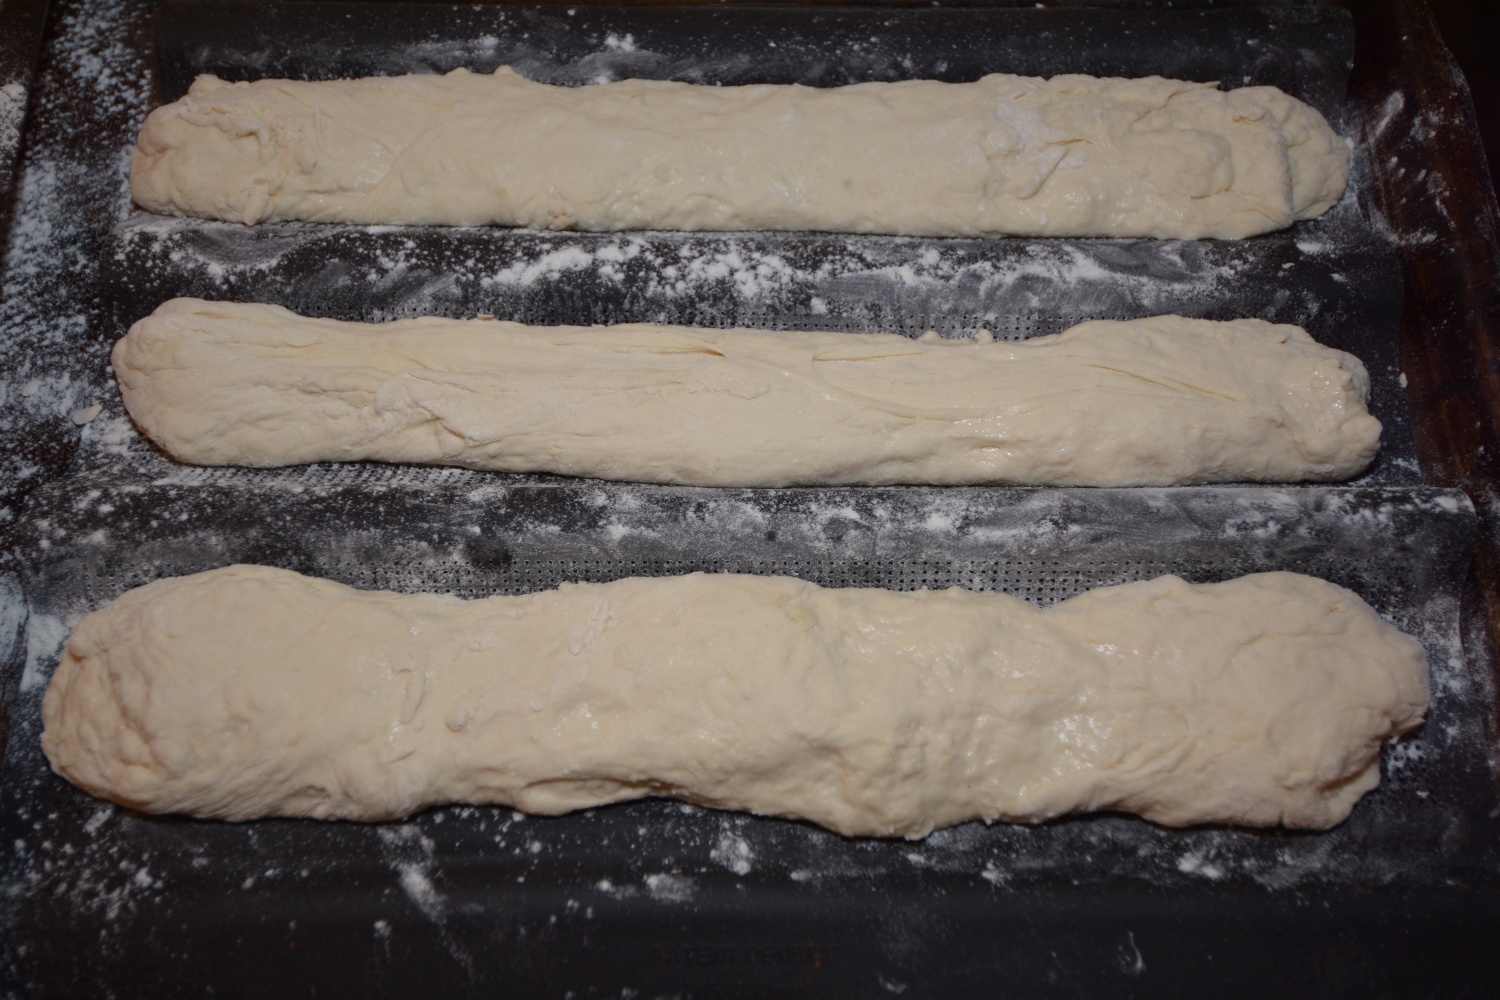
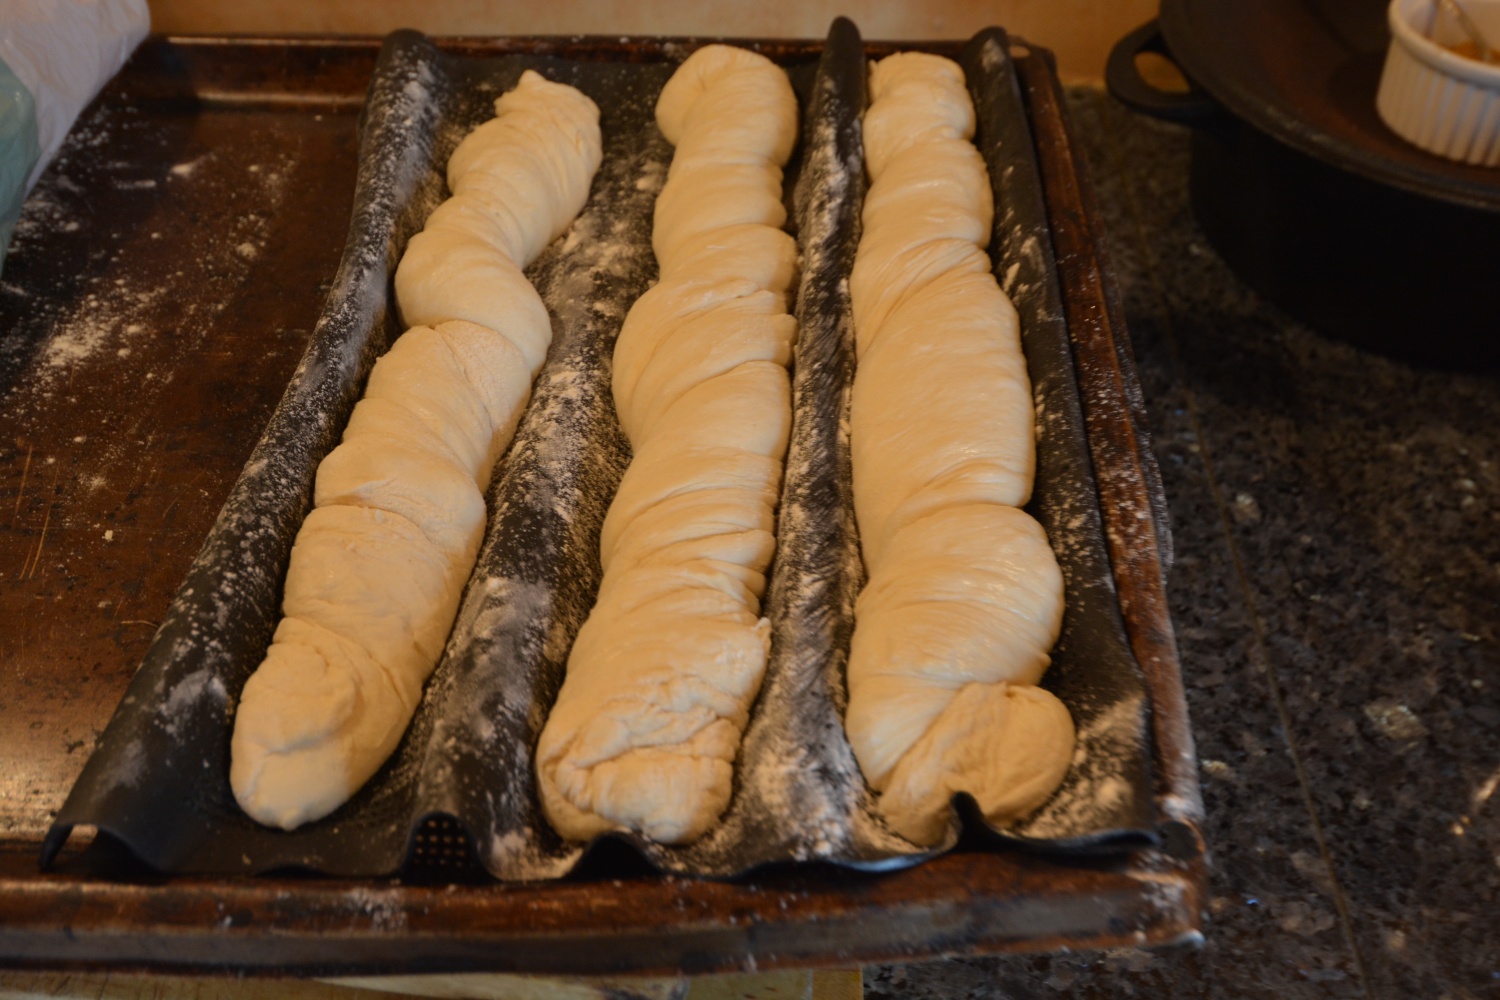
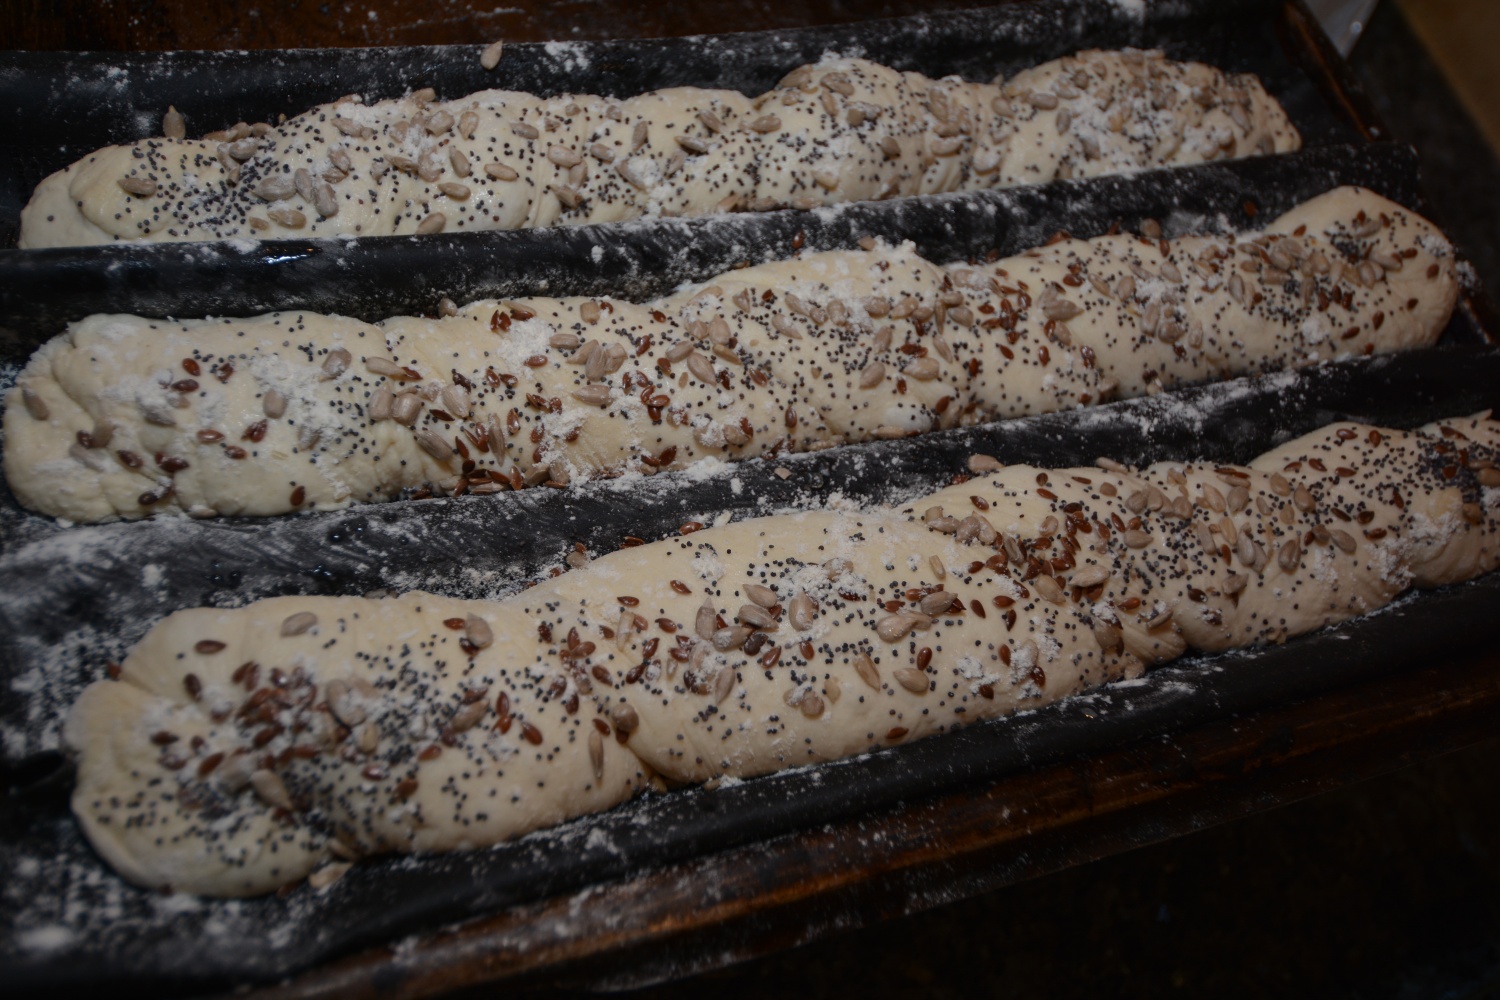
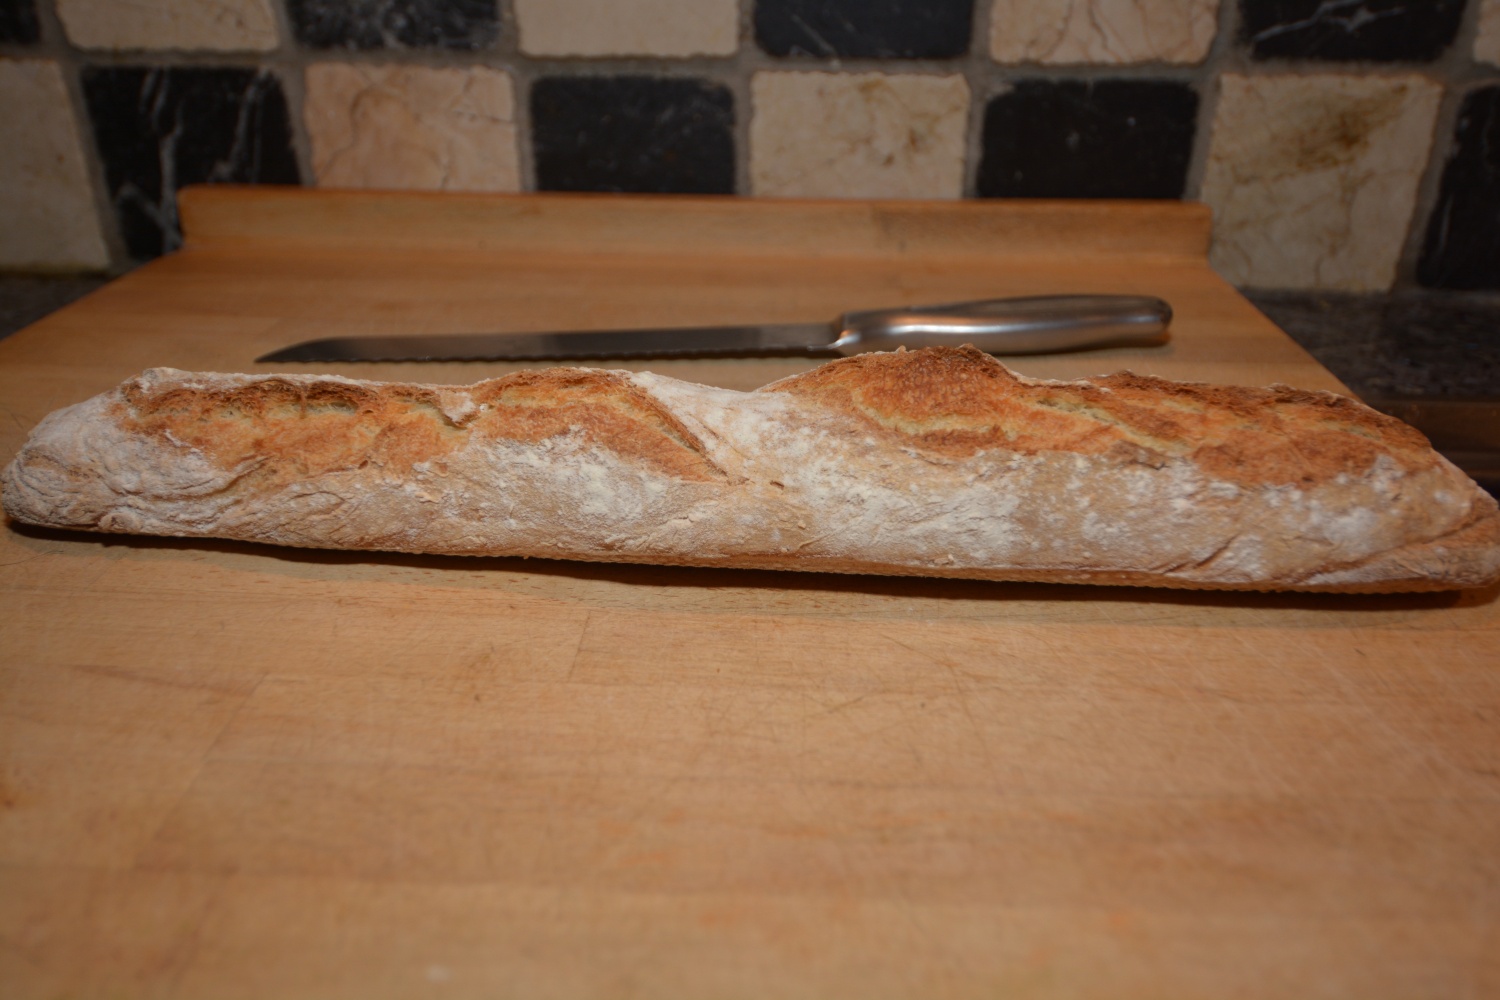
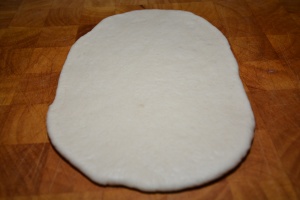
Put dough on a floured surface and cut in 6 equal pieces. Roll each to a baguette. The more asymmetrical, the better and more rustic. Cover with towel and let double in size again. Put over to 475 F/250 C. Place a cast iron casserole in the bottom. Place baguette in middle of oven and quicly add 1 cup of water in casserole under. Baking time is 30 min but this can vary, my oven only needs 2o minutes. Cool before serving if you can stand the temptation… And the smell, oh boy…
The recipe will give you those crunchy and great looking wonders. Follow my advice, you will get them on your table to the delight of your friends and family. If you make a quantity, you can freeze part, as they are best fresh.
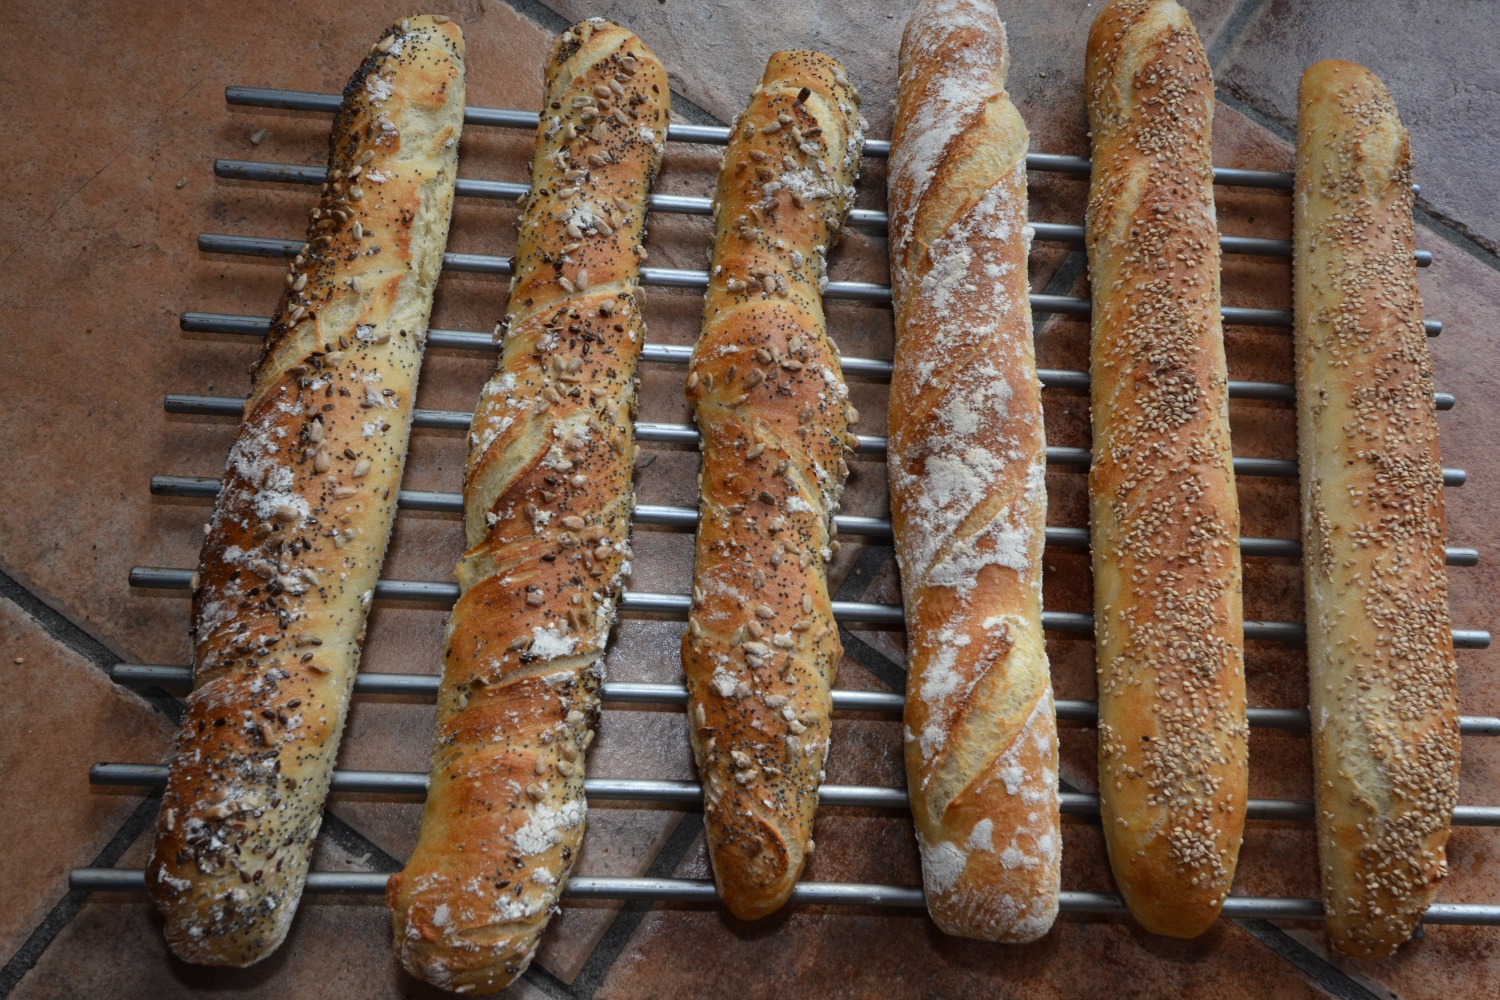
PS. You can twist the dough, sprinkle with different seeds if you are i a creative mood..
Naan heaven
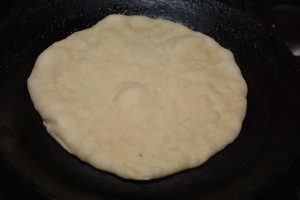
As l promised in my last post, here is a recipe for the Naan bread. The word naan means flat bread in it’s original Persian. The one I made is a Punjabi Naan. It is not as common in India as we tend to believe and originates from northern India, especially Kashmir and Punjab. I took the recipe from «The Australian Weekly Magazine» and this version is for the home oven. Traditionally they bake it in a tandoor clay oven that arrives at high temperatures. This gives the characteristically bubbly appearance. You can simulate this by putting the dough on a hot, cast iron frying pan. Then you skip the yogurt topping. Do as follows; wet the dough on one side and spread some butter, sesam, poppy or nigella seeds on the other. Put the wet side on the warm pan, cover with a lid and wait until bubbles appear on the top. Put the top, bubbly side over a flame to give it the typical charred appearance.

Usually naan are more flat than on the picture. It’s easy to prepare, hard to resist and can accompany lot’s of different dishes. This recipe has a velvety, soft texture and is coated with yogurt, poppy and nigella seeds.
You can use white flour or partly whole wheat flour. You can also use a strong flour with higher gluten content for the characteristic chewy, elastic texture. It’s is often served with various curry dishes and dal.
The recipe is enough for 8-10 pieces.
- 7 gr of dry yeast
- 1 tsp sugar
- half cup warm water
- 3 1/2 cup plain flour
- 2 tsp sugar additionally
- quarter cup plain yogurt
- quarter cup water
- 1/2 tsp ground cumin
- 1 egg lightly beaten
- 60 gr oil, butter or gee, melted
- 2 tsp salt
- 1/2 cup plain yogurt
- 2 tbsp poppy seeds

Combine yeast, sugar, water and 1/2 cup of the flour in a small bowl. Stir until smooth. Cover and let stand in a warm place for 10 minutes until foamy. Shift remaining flour and extra sugar into large bowl making a well in center. Pour yeast mixture into the dry ingredients. Stir in yogurt, extra water, cumin, egg, gee or oil and salt. Knead by hand or machine for 7 minutes until dough is smooth and elastic. Place into a lightly oiled, large bowl. Let stand until doubled in size, about 45 minutes. Move it into a surface and divide into 8-10 portions. Roll into balls, cover and let stand for 5 minutes. Roll on a lightly floured surface and flatten to rounds about 15 cm. Spread extra yogurt over each round. Sprinkle with poppy seeds and nigella. Move into tray with baking paper and let it stay for another 5 minutes. Bake on moderately hot oven for 12 minutes or until brown and crisp.
This can be fun and you can activate the whole family in the process. From the stages of preparation to the sharing of magic moments around the table.
 d
d
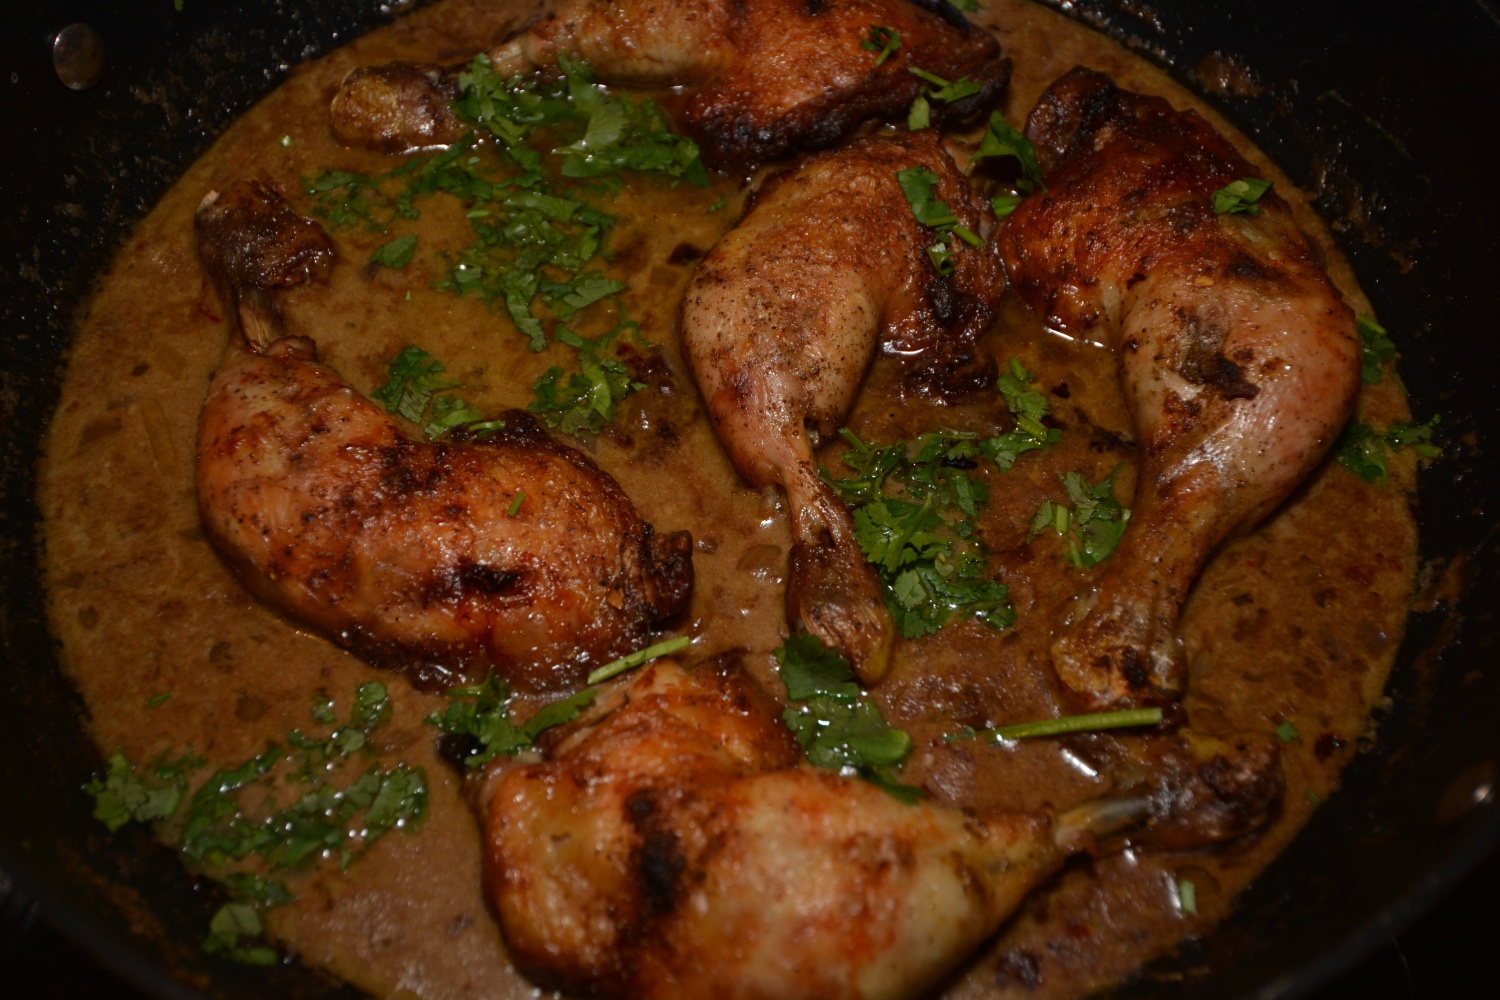
Grilled chicken curry
Here is a dish we had last week. It seems to have captured the heart of my husband as well as my three children. As it happened, we enjoyed it on a shabat evening dinner, the occasion for special dishes, small surprises and spending some time together. Since l have three teenagers at home with plans and priorities, I went for something quick. And since one of my boys wanted something Indian, this recipe came to my mind.
It contains aromatic spices, soya sauce, coconut milk and chicken. Easy to prepare and in less than an hour you can have it ready. You can prepare it in advance and grill the chicken just before serving.
The recipe is for five.
- 2 tbs vegetable oil
- five chicken tights
- 1 medium onion finely chopped
- 1 tsp fresh lemon grass finely chopped
- 2 tbsp ground coriander
- 1 tbsp ground cumin
- 1 tsp ground cardamon
- 1/2 tsp ground cloves
- 1/2 tsp chili powder
- 2 cans coconut cream
- 1 tbsp soya sauce
- 1/4 cup of chopped fresh coriander
Heat oil in large saucepan. Add chicken, turning and removing it when brown on all sides.
Add the onion and stir until soft. Add garlic, lemon grass and all the spices and stir on medium heat for a few minutes.
Add the chicken to the pan, coat it with the sauce mixture and stir in the coconut cream. Bring to a boil. Reduce heat, cover and simmer until tender.
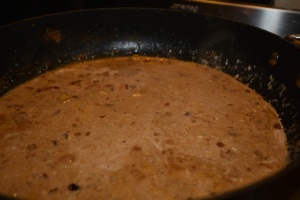
Remove chicken and put it under hot grill until crisp all over. Boil sauce until reduced by a third.
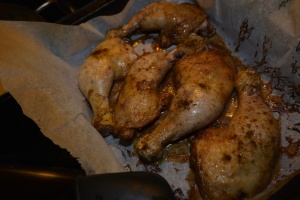
Stir in fresh coriander, add the chicken and serve with white Basmati rice and nan bread. (will come soon). I used just one can of coconut and that worked just fine.
This recipe was a big success in our home. It produced a lot of compliments and left everyone with a happy smile.
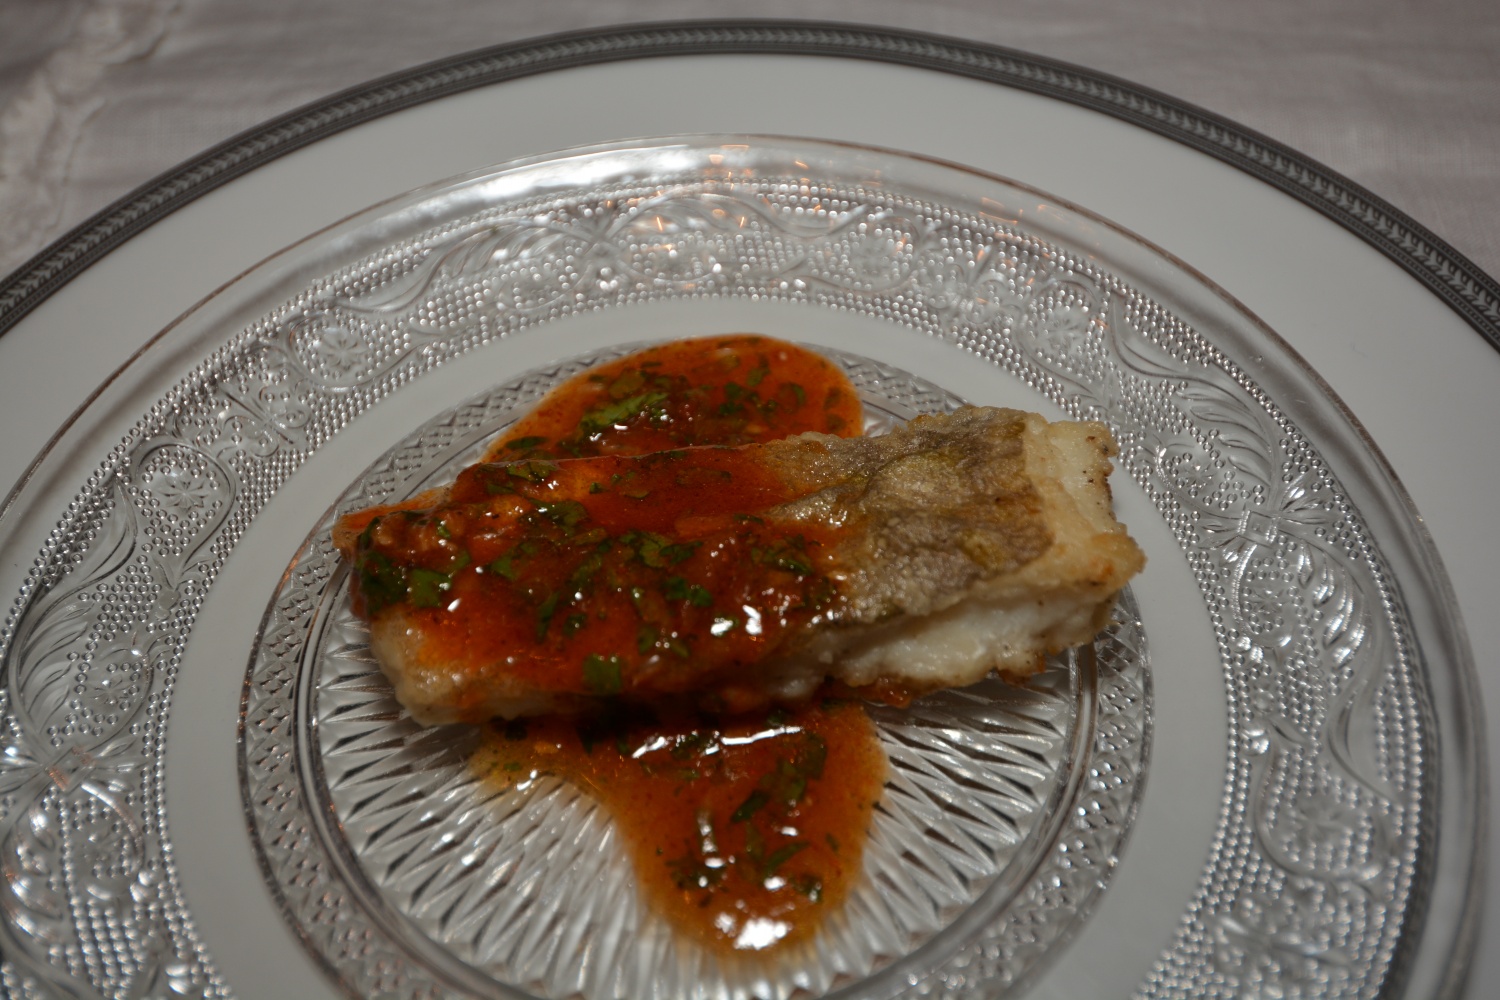
Fish Chermoula
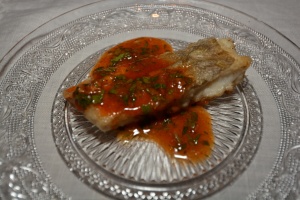
On every day basis, it’s important for me to eat a varied, healthy and above all tasty diet. This dish with the sauce is exactly all of that. It’s a North African sauce, a type of vinaigrette that is used mostly with fresh fried fish or sardines and sea food. I found that you can use it on lightly roasted vegetables, chicken, beans and couscous dishes as well as salads. Its fresh, full of flavour and easy to prepare.
Since my family ate heartily of the sauce, being very popular, I had to use leftovers for the above picture. Thus the smallish quantity -I hope you can still get the idea..
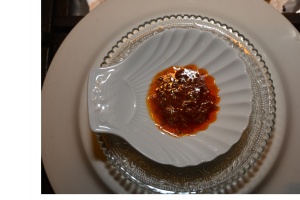
Chermoula is a mixture of oil, lemon juice, herbs, garlic and spices that could be varied from region to region and family to family. Some use preserved lemon, saffron or even ginger. It’s one of those sauces that you make in no time, just mix all the ingredients together.
The recipe calls for Harissa (coming soon) which is hot chili pepper paste, again from North Africa. The main ingredients are roasted red pepper, spices and herbs such as garlic,and oil or olive oil mixed together. You can buy it in middle eastern shops.
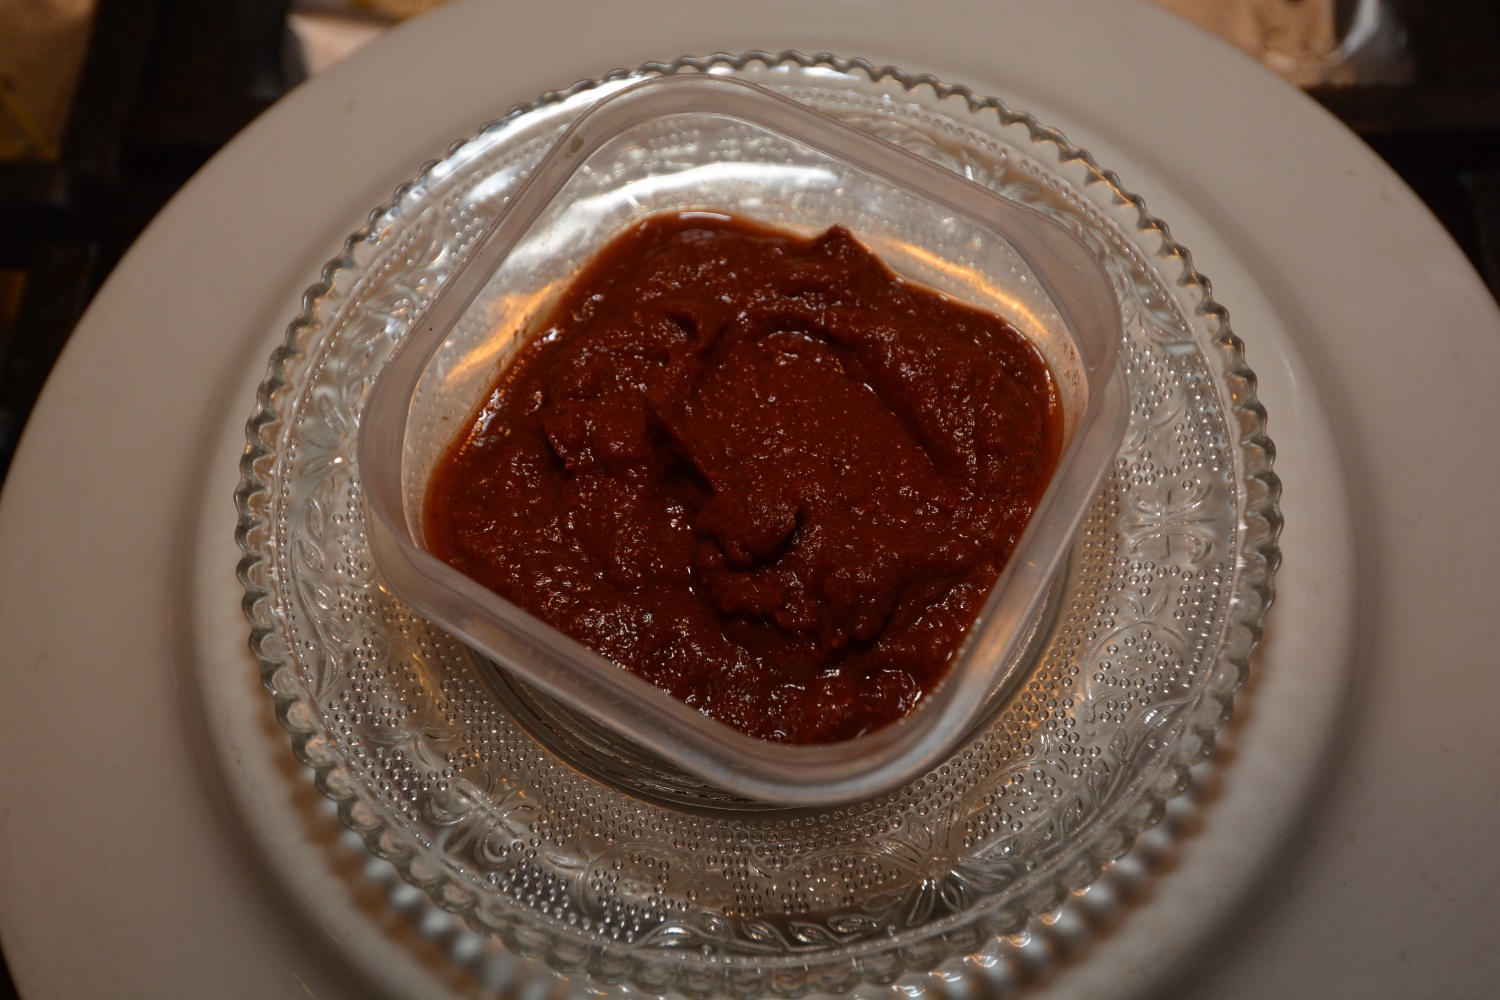
Chermoula sauce:
- 1/2 glass of lemon juice
- 1 tbs of olive oil
- 1 tsp of crushed garlic
- 1 flat tsp of harissa
- 1 flat tsp of sweet paprika
- 1/2 tsp cumin spice
- bundle of chopped coriander
- salt
- option: 1 tsp of pickled chopped lemon (recipe to come soon…)
Quantities can be increased, according to need. The above is enough for 4-5 portions.
. 
The recipe is from Marylin’s wonderful blog mablogeria.blogspot.com. She is a well known blogger with mouth watering recipes.
Easy, quick, and a slightly different ‘s! I hope you will enjoy it and it may give you a new food experience!
The joys of cherry tomatoes
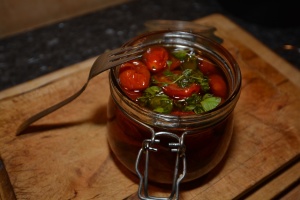
To pickle vegetables, has always fascinated me, it gives them a new life, a different taste and is a way to preserves them. Then there are ways to roast, fry or cook and put them in oil, without properly pickling them.
One dark evening of autumn, I needed something to cheer me up. I felt like playing with a bunch of friendly cherry tomatoes. As I had a quantity of them I decided on something slightly different, something fun and above all, hopefully something tasty. Since I love vegetables and like to make various spreads to complement a meal, this one is a twist that can also be used as a tapas. It is not my original recipe. I found it on a great blog by the name BISSIM. I just modified it to suit my taste.
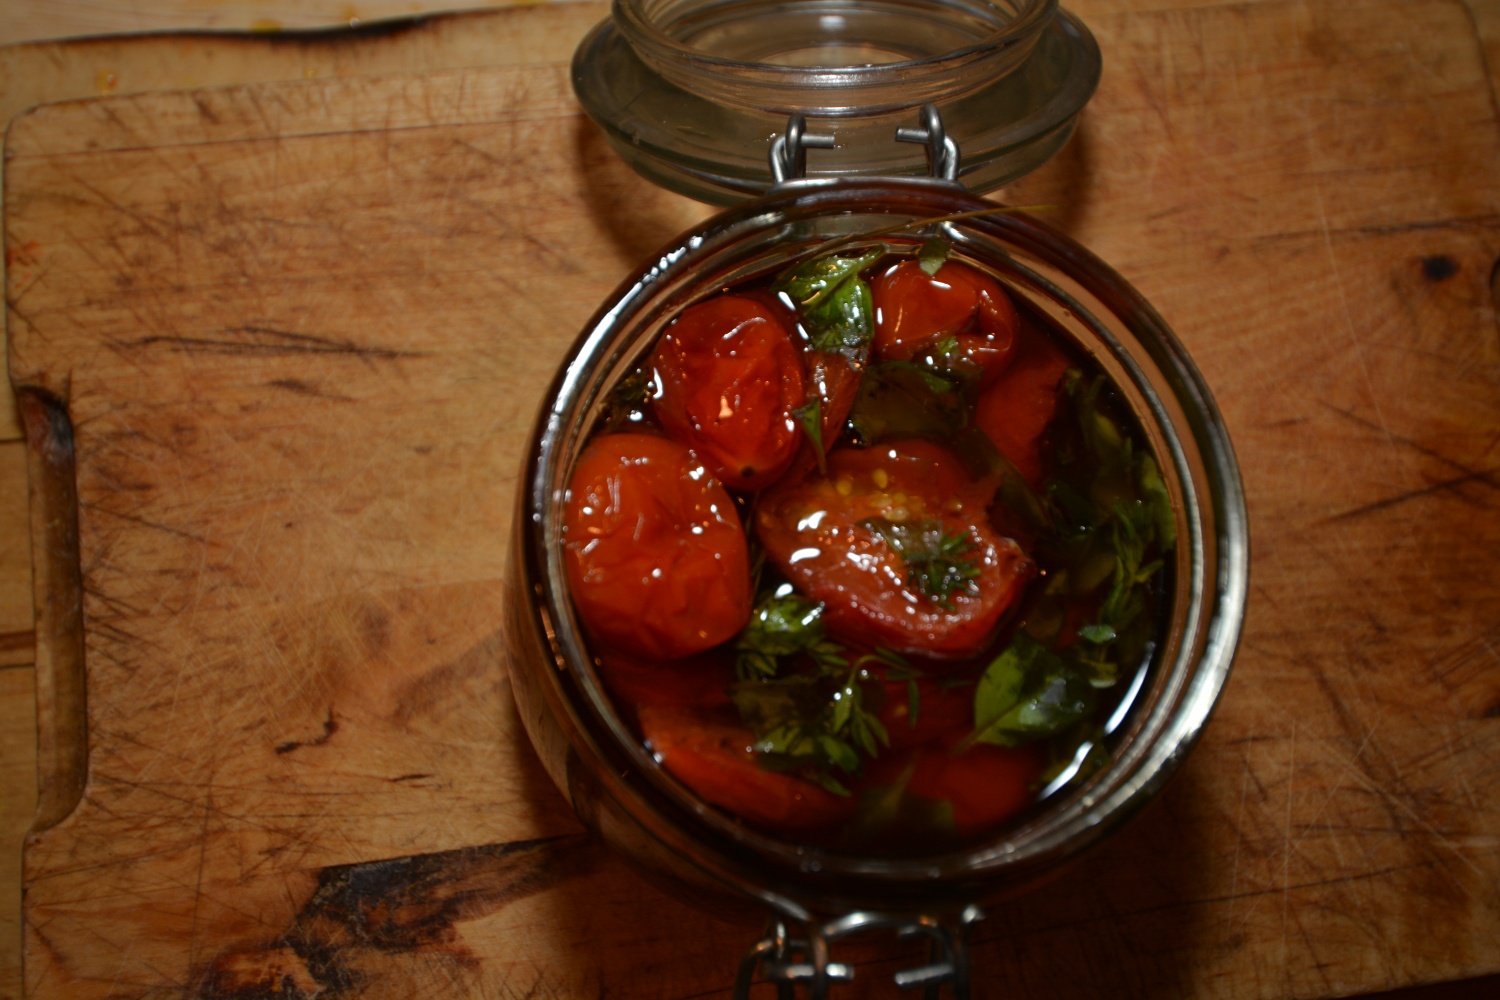
This is not really a recipe. Take a quantity of cherry tomatoes, mix of colors if you like. The biggest ones can be divided and the rest left whole. Put them in one layer in an oven form and drizzle generously with some olive oil, salt and fresh ground pepper. Add some balsamic vinegar, a few drops of lemon and grated lemon skin. Then add one or two cloves of garlic, chopped or crushed . Now add fresh thyme or chopped basil leaves. Sprinkle some sugar and put into oven at 180 degrees Celsius. Leave until you think it is ok, usually around 10-20 minutes.
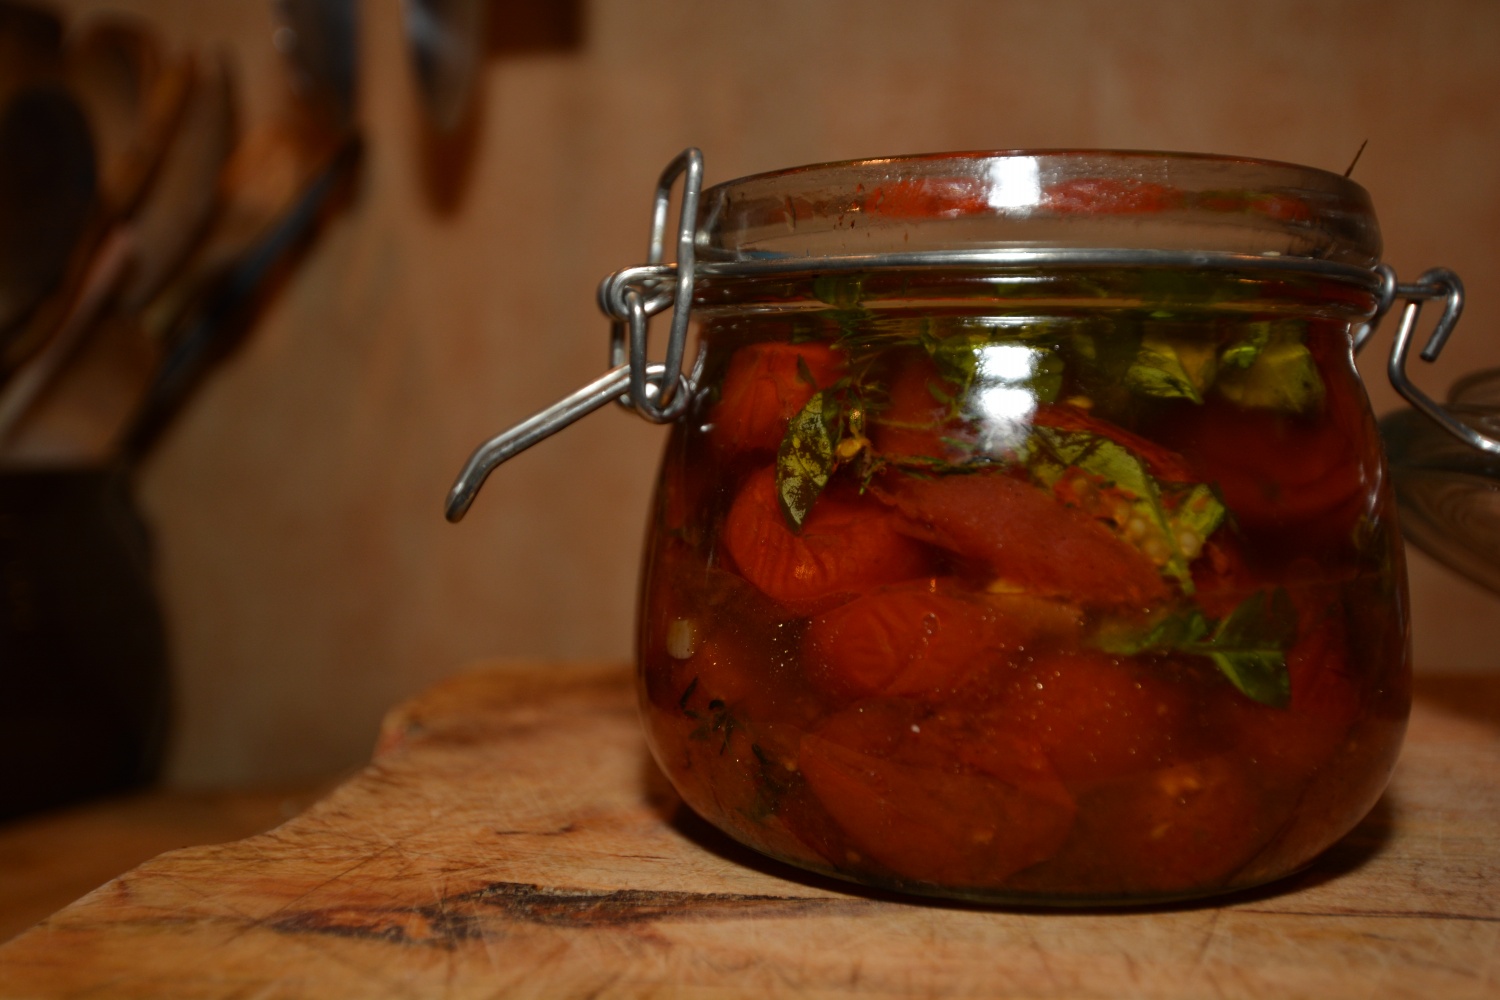
Cool it down and move it to a jar and put it into the fridge. Leave it preferably for a couple of days before eating. But if you are impatient like me, you can try it out immediately.
It is good on sandwiches, served as tapas, fits to pasta dishes, as part of chicken and fish dishes and the list could go on.
Easy, quick, heartwarming, tasty – and fun. What more do you expect?
Khachapuri surprise

Being from Israel, l got the chance to try many different kinds of food, as part of the people coming from so many countries.
This melting pot of backgrounds, created a wide range of dishes. In addition, people often live in mixed neighborhoods as well as many families being mixed,bringing with them the different culinary traditions often in the same family. Each group kept the different food culture they brought with them from before and of course the love for the culture.
The different kitchens from Europe, North Africa, the Mediterranean, Arab, Etiopia, Russia and the countries around, together with the influence of the American, Asian and Japanese kitchen, are creating an indigenous cuisine that is shaping the local food scene in Israel.

Many dishes of various origin, fits to be eaten for a weekend breakfast. Today I made Khachapuri, a Georgian dish.
There are different versions of this. Basically it is a dish in which open dough is filled with a special Georgian cheese and topped with an egg. Since Georgian cheese is hard to find, I have made a version combining feta and ricotta.
The dish comes in different shapes, usually round or oval. It can be served at any time but is well suited for breakfast.
The recipe is as follows:
- 1 tsp salt
- 30 gr butter or 20 gr olive oil
- 1 1/2 cups of lukewarm water
- 25 gr fresh yeast or two tbsp dry yeast
- 500 gr flour
Filling:
- 400 gr feta
- 200 gr ricotta cheese
- salt and pepper
- 5 eggs
- coarse salt
Mix the flour and the yeast in a big bowl. Make a central depression into which you add the water, butter or oil and salt. Mix the dough. If the dough is sticky, add some more, up to a quarter of a cup of flour.
Cover the bowl to let the dough double in size. Mix the dough again and divide info five pieces. Let it rise again on a light flour surface, covered.
Meanwhile, mix the two cheese and the salt. Be careful as the feta can be salty.
Open each of the dough to a circle with a rolling pin. (not too thin) Spread in the middle of every circle the cheese filling.
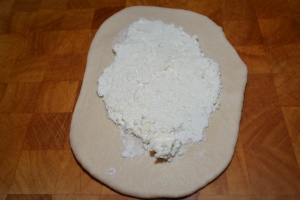
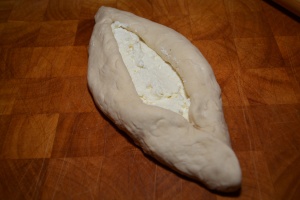
Pick up the dough from each side and put them together at the edges to a boat shape.
Put in a form with a baking paper and bake in preheated oven at 200 C for 15-20 min.
Take the form out of the oven and with the help of a fork, push a bit to the side the cheese filling and break an egg in the middle.

Spread some salt on the top and put back in the oven for another 5 min or until the egg is done to your preference.
Recommended served with salad and a picant sauce.
Comments: According to my experience, each piece is quite big and requires a quantity of filling. It is therefore recommended to divide the dough to ten pieces instead of five, giving somewhat smaller portions. You can also freeze the pieces after baking and before adding the egg, thus preserving some of it for later.
Hope you like it and that it gives you food pleasures… More to come soon.